Acrylic Seascape Details

Acrylic seascape by Eileen McKenna

Painting Seascapes

Before beginning to work in acrylics, I practiced painting seascapes in watercolor. Although acrylics are different, I found practicing in watercolor to be very useful. I developed a process that, when I switched to acrylics, I could follow. And painting with watercolor on paper is less expensive than using up canvases.

Coastal inspired art | watercolor seascape by Eileen McKenna
Watercolor Seascape by Eileen McKenna

Process for Painting Seascapes

Here is a summary of my painting process. Keep reading for links to more in depth resources.

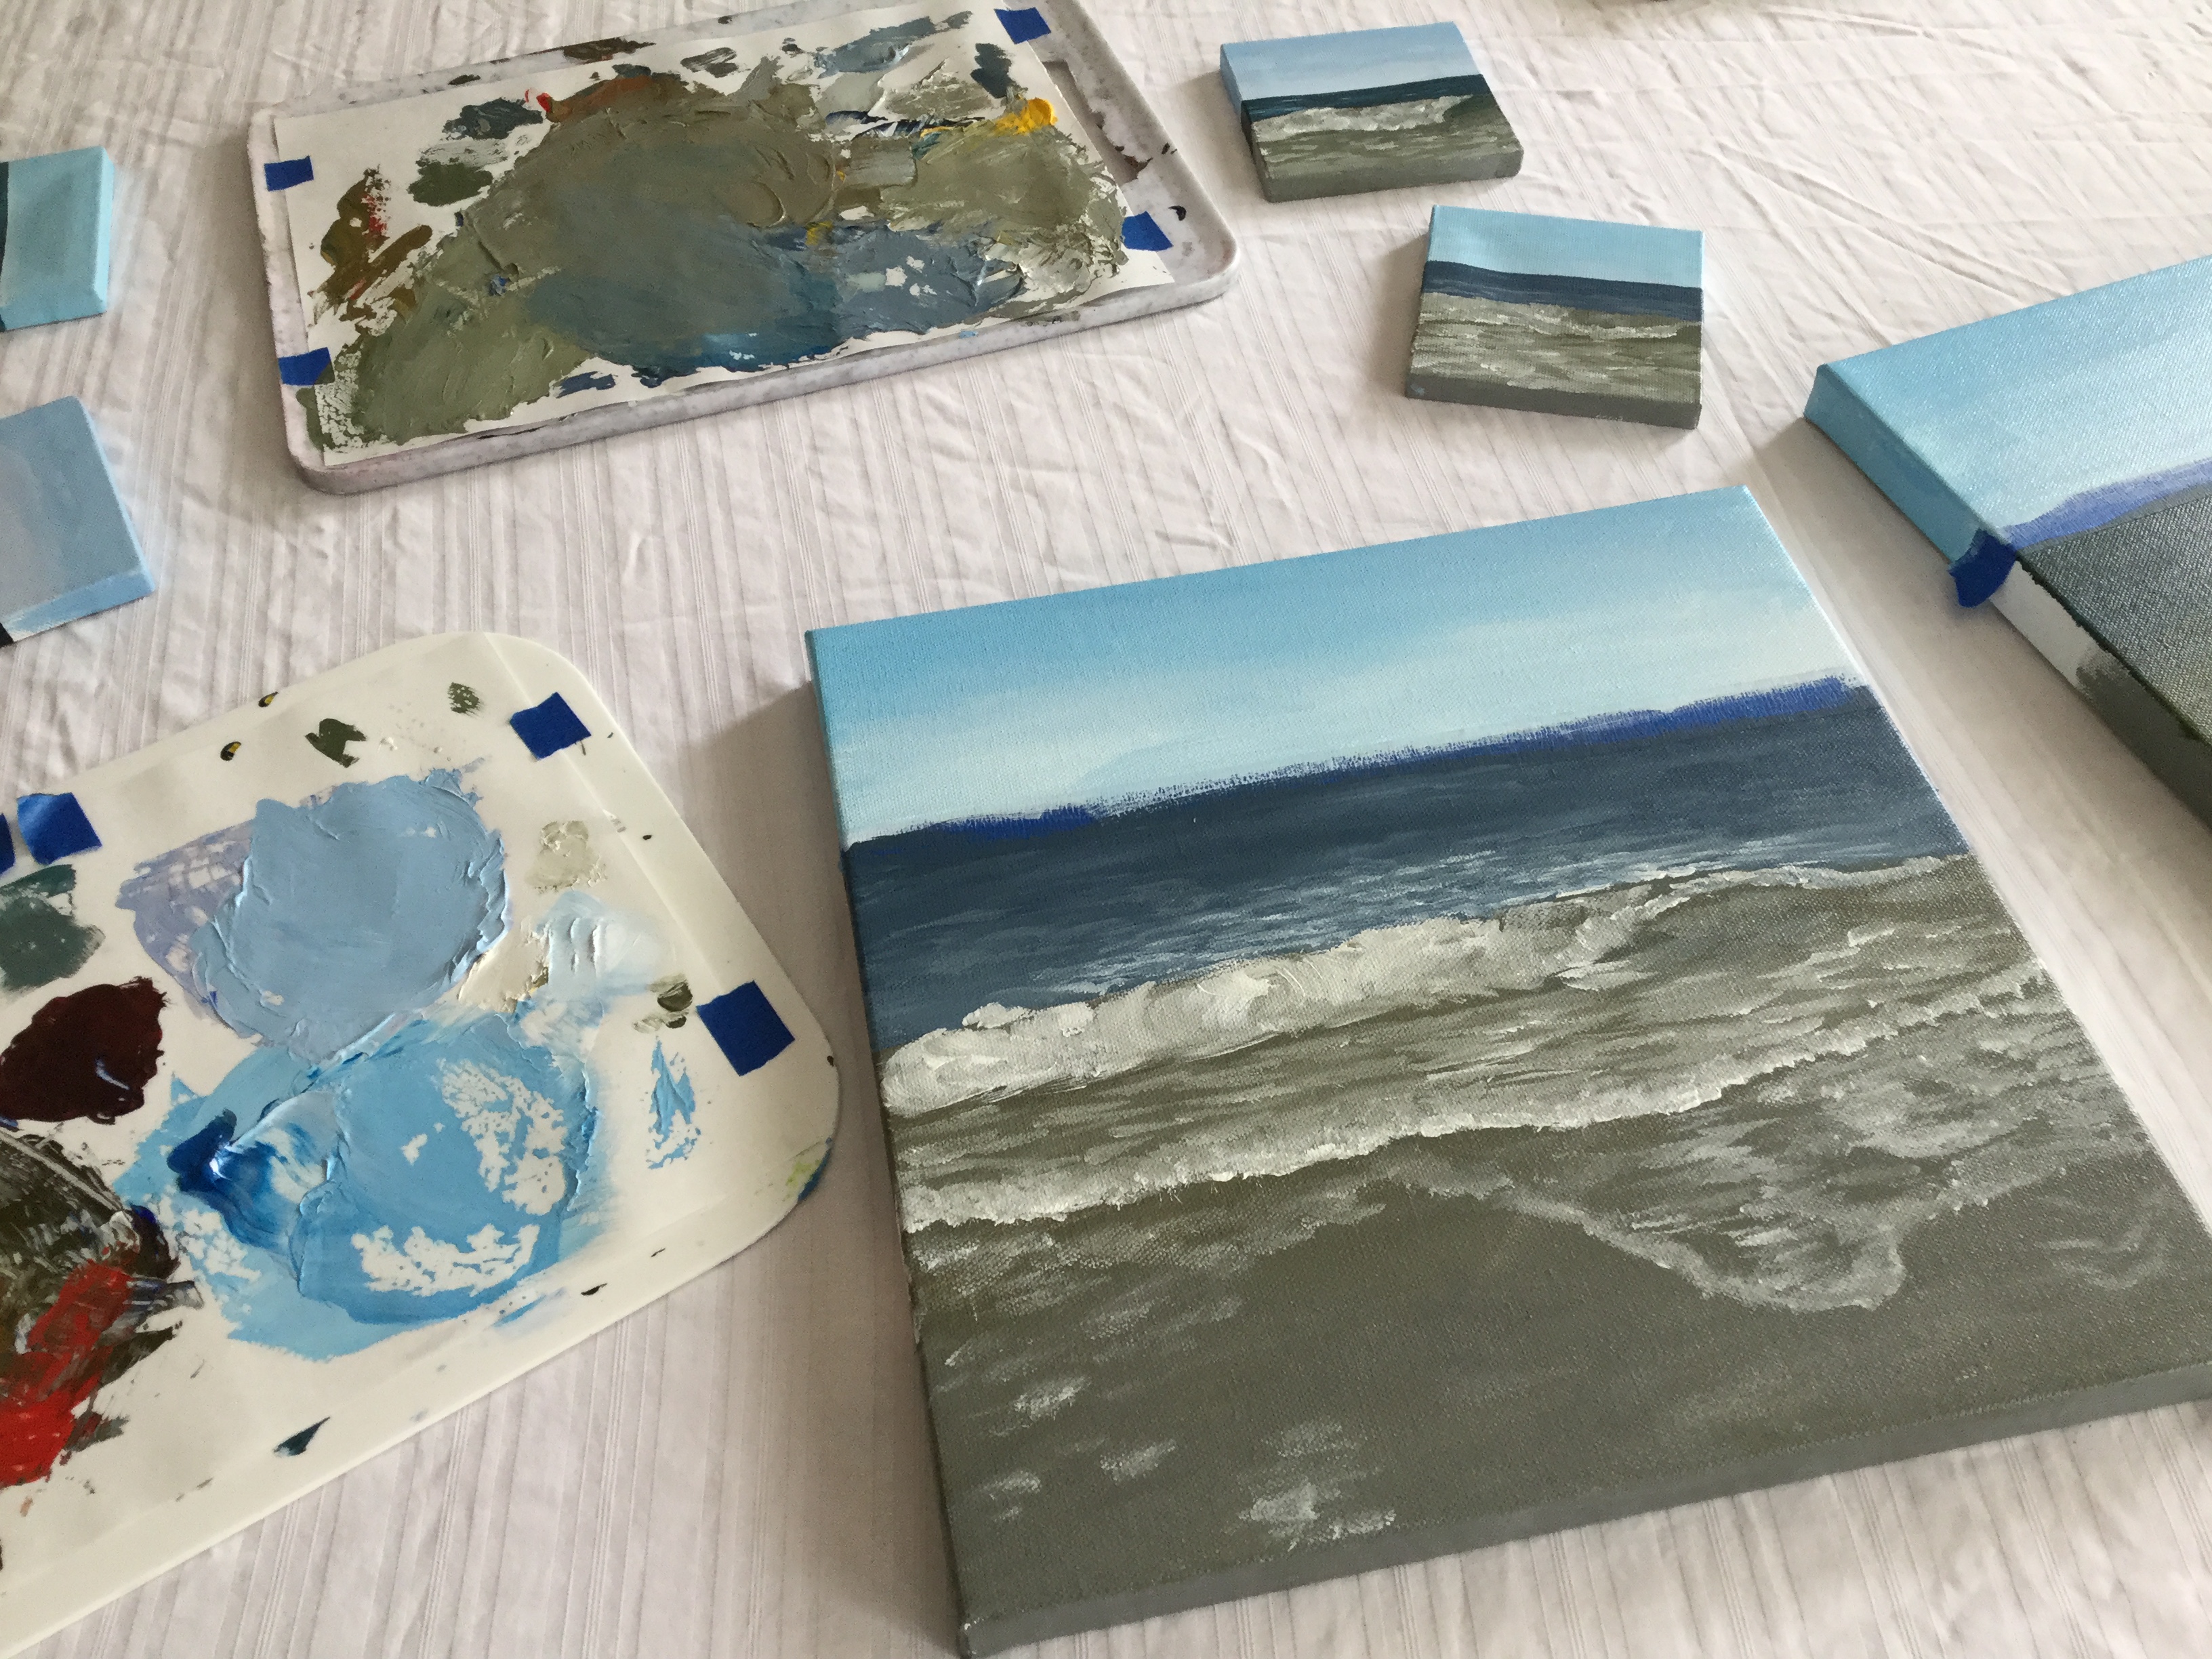
  1. Mix seascape colors  – I mix blues, greens, and browns from ultramarine blue, cadmium yellow, and cadmium red.
  2. Mark the horizon line. I use painter’s tape to achieve a straight horizon line.
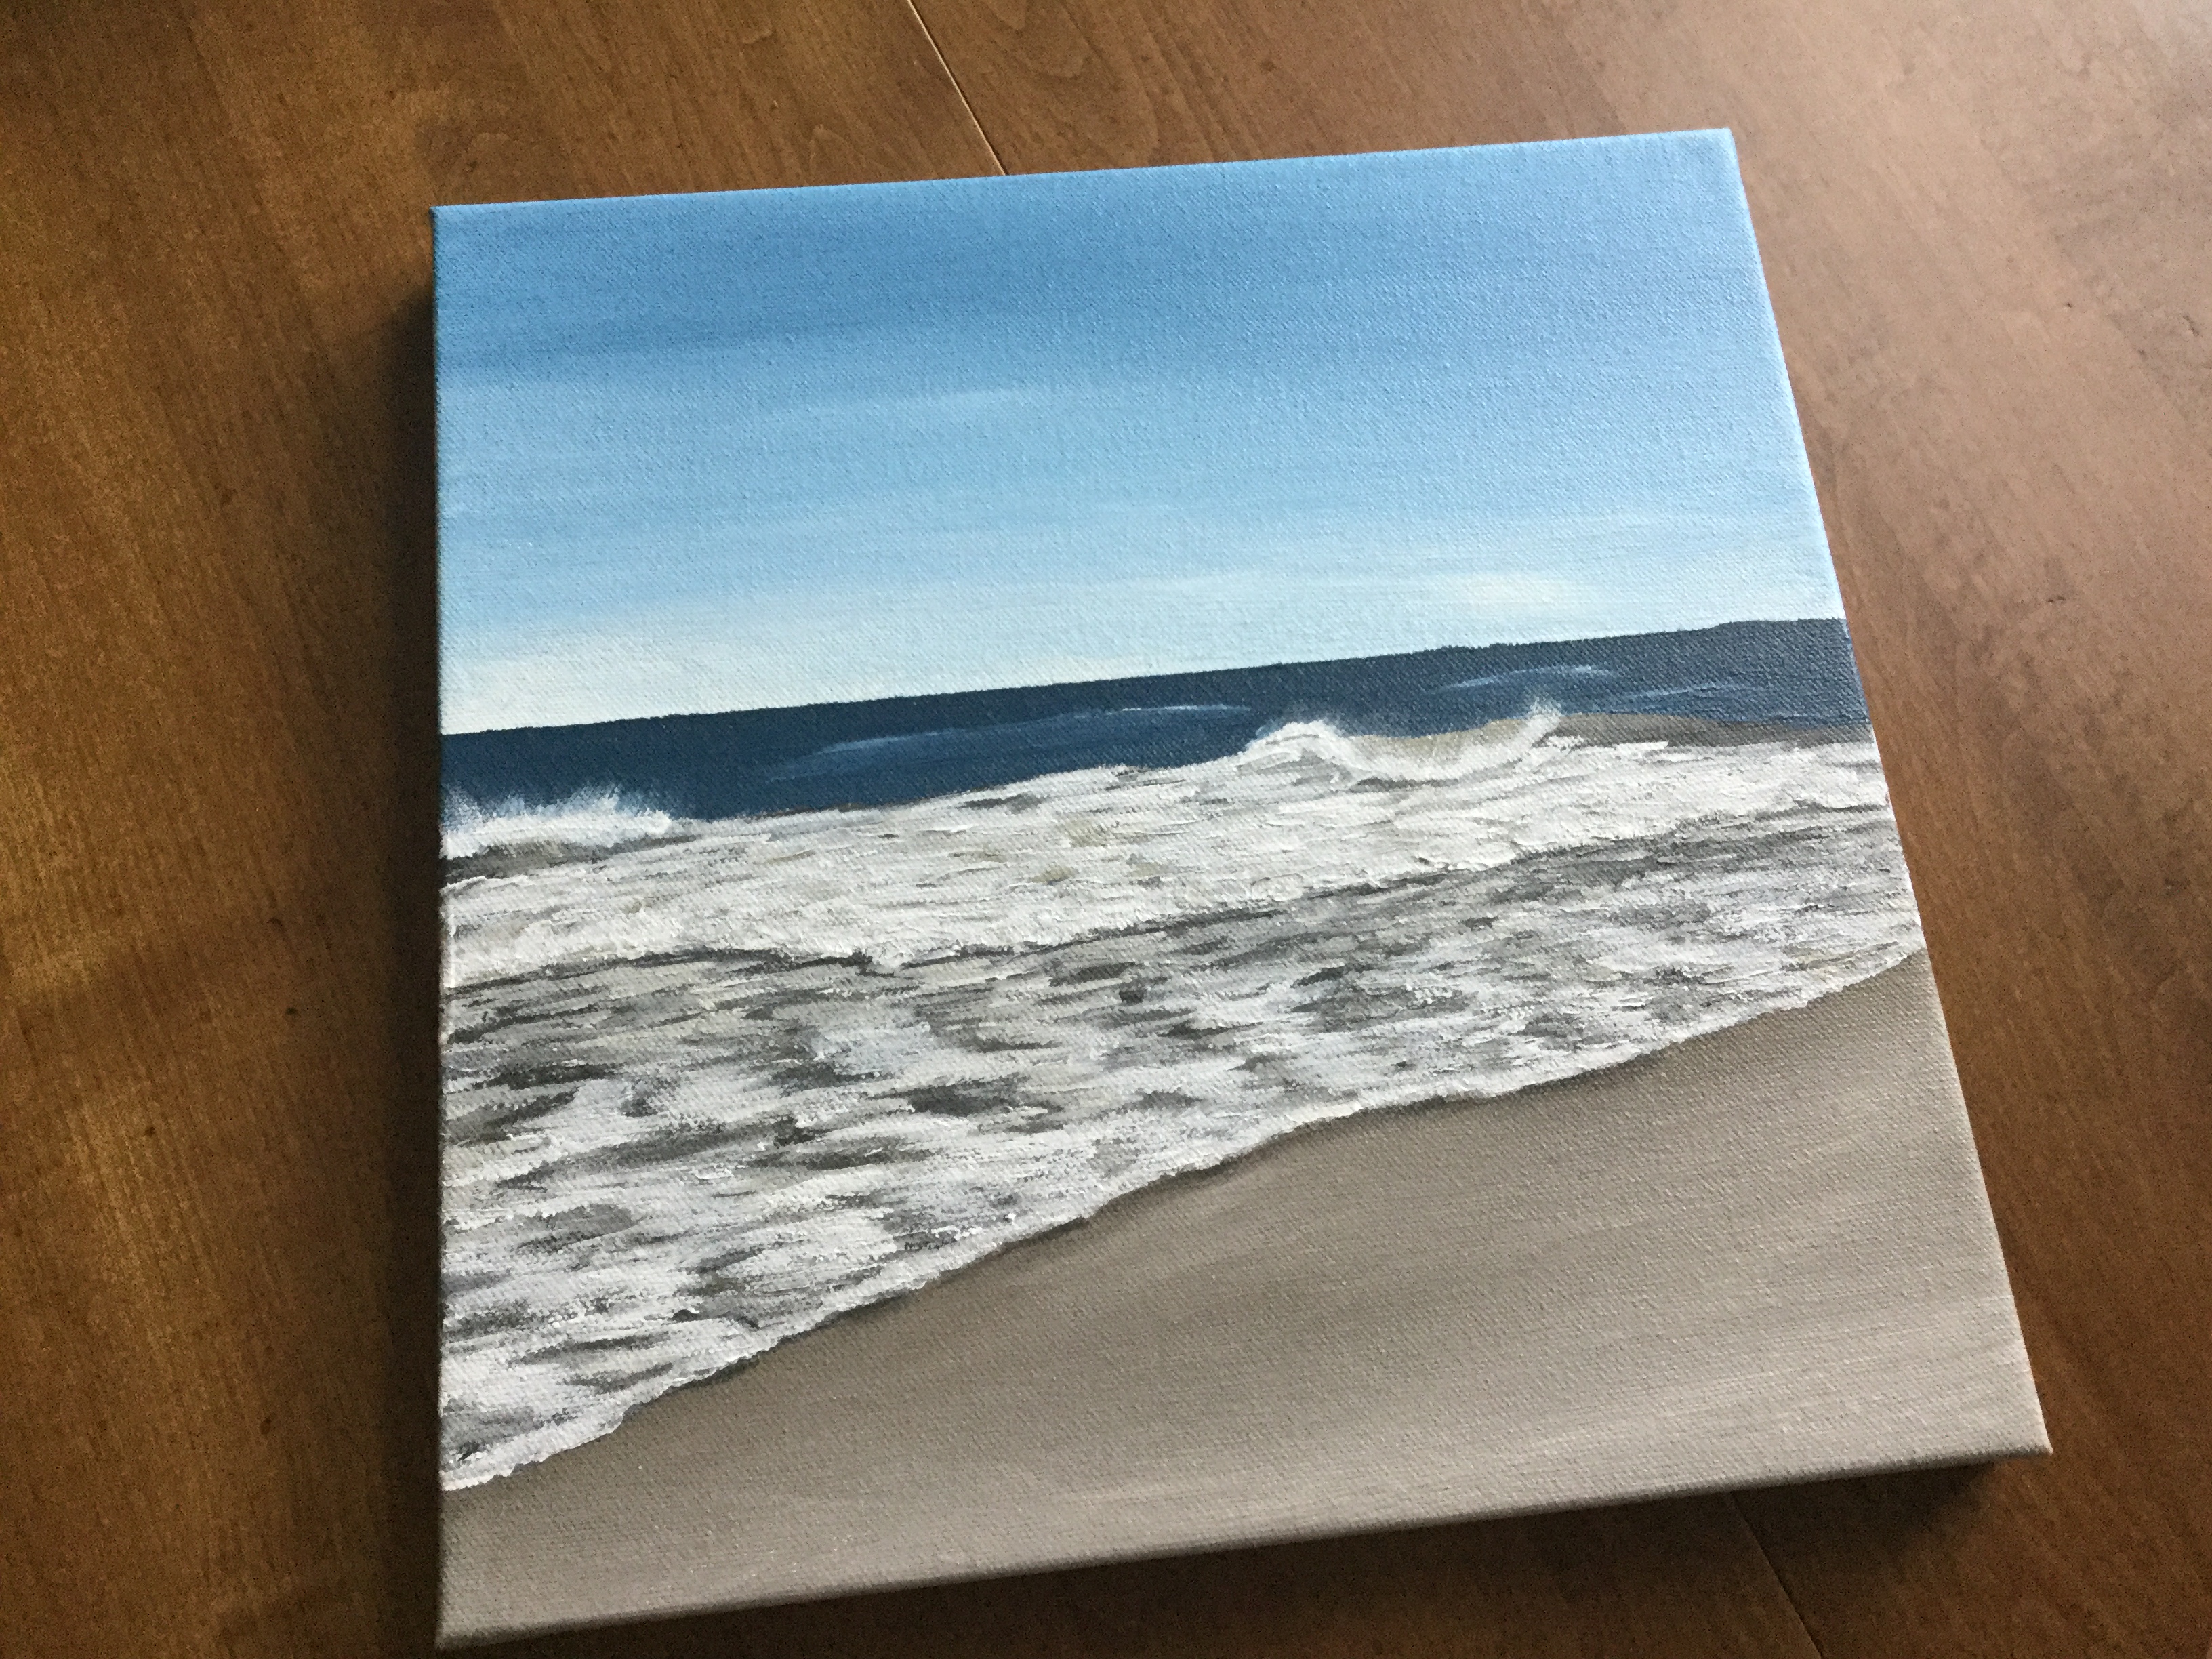
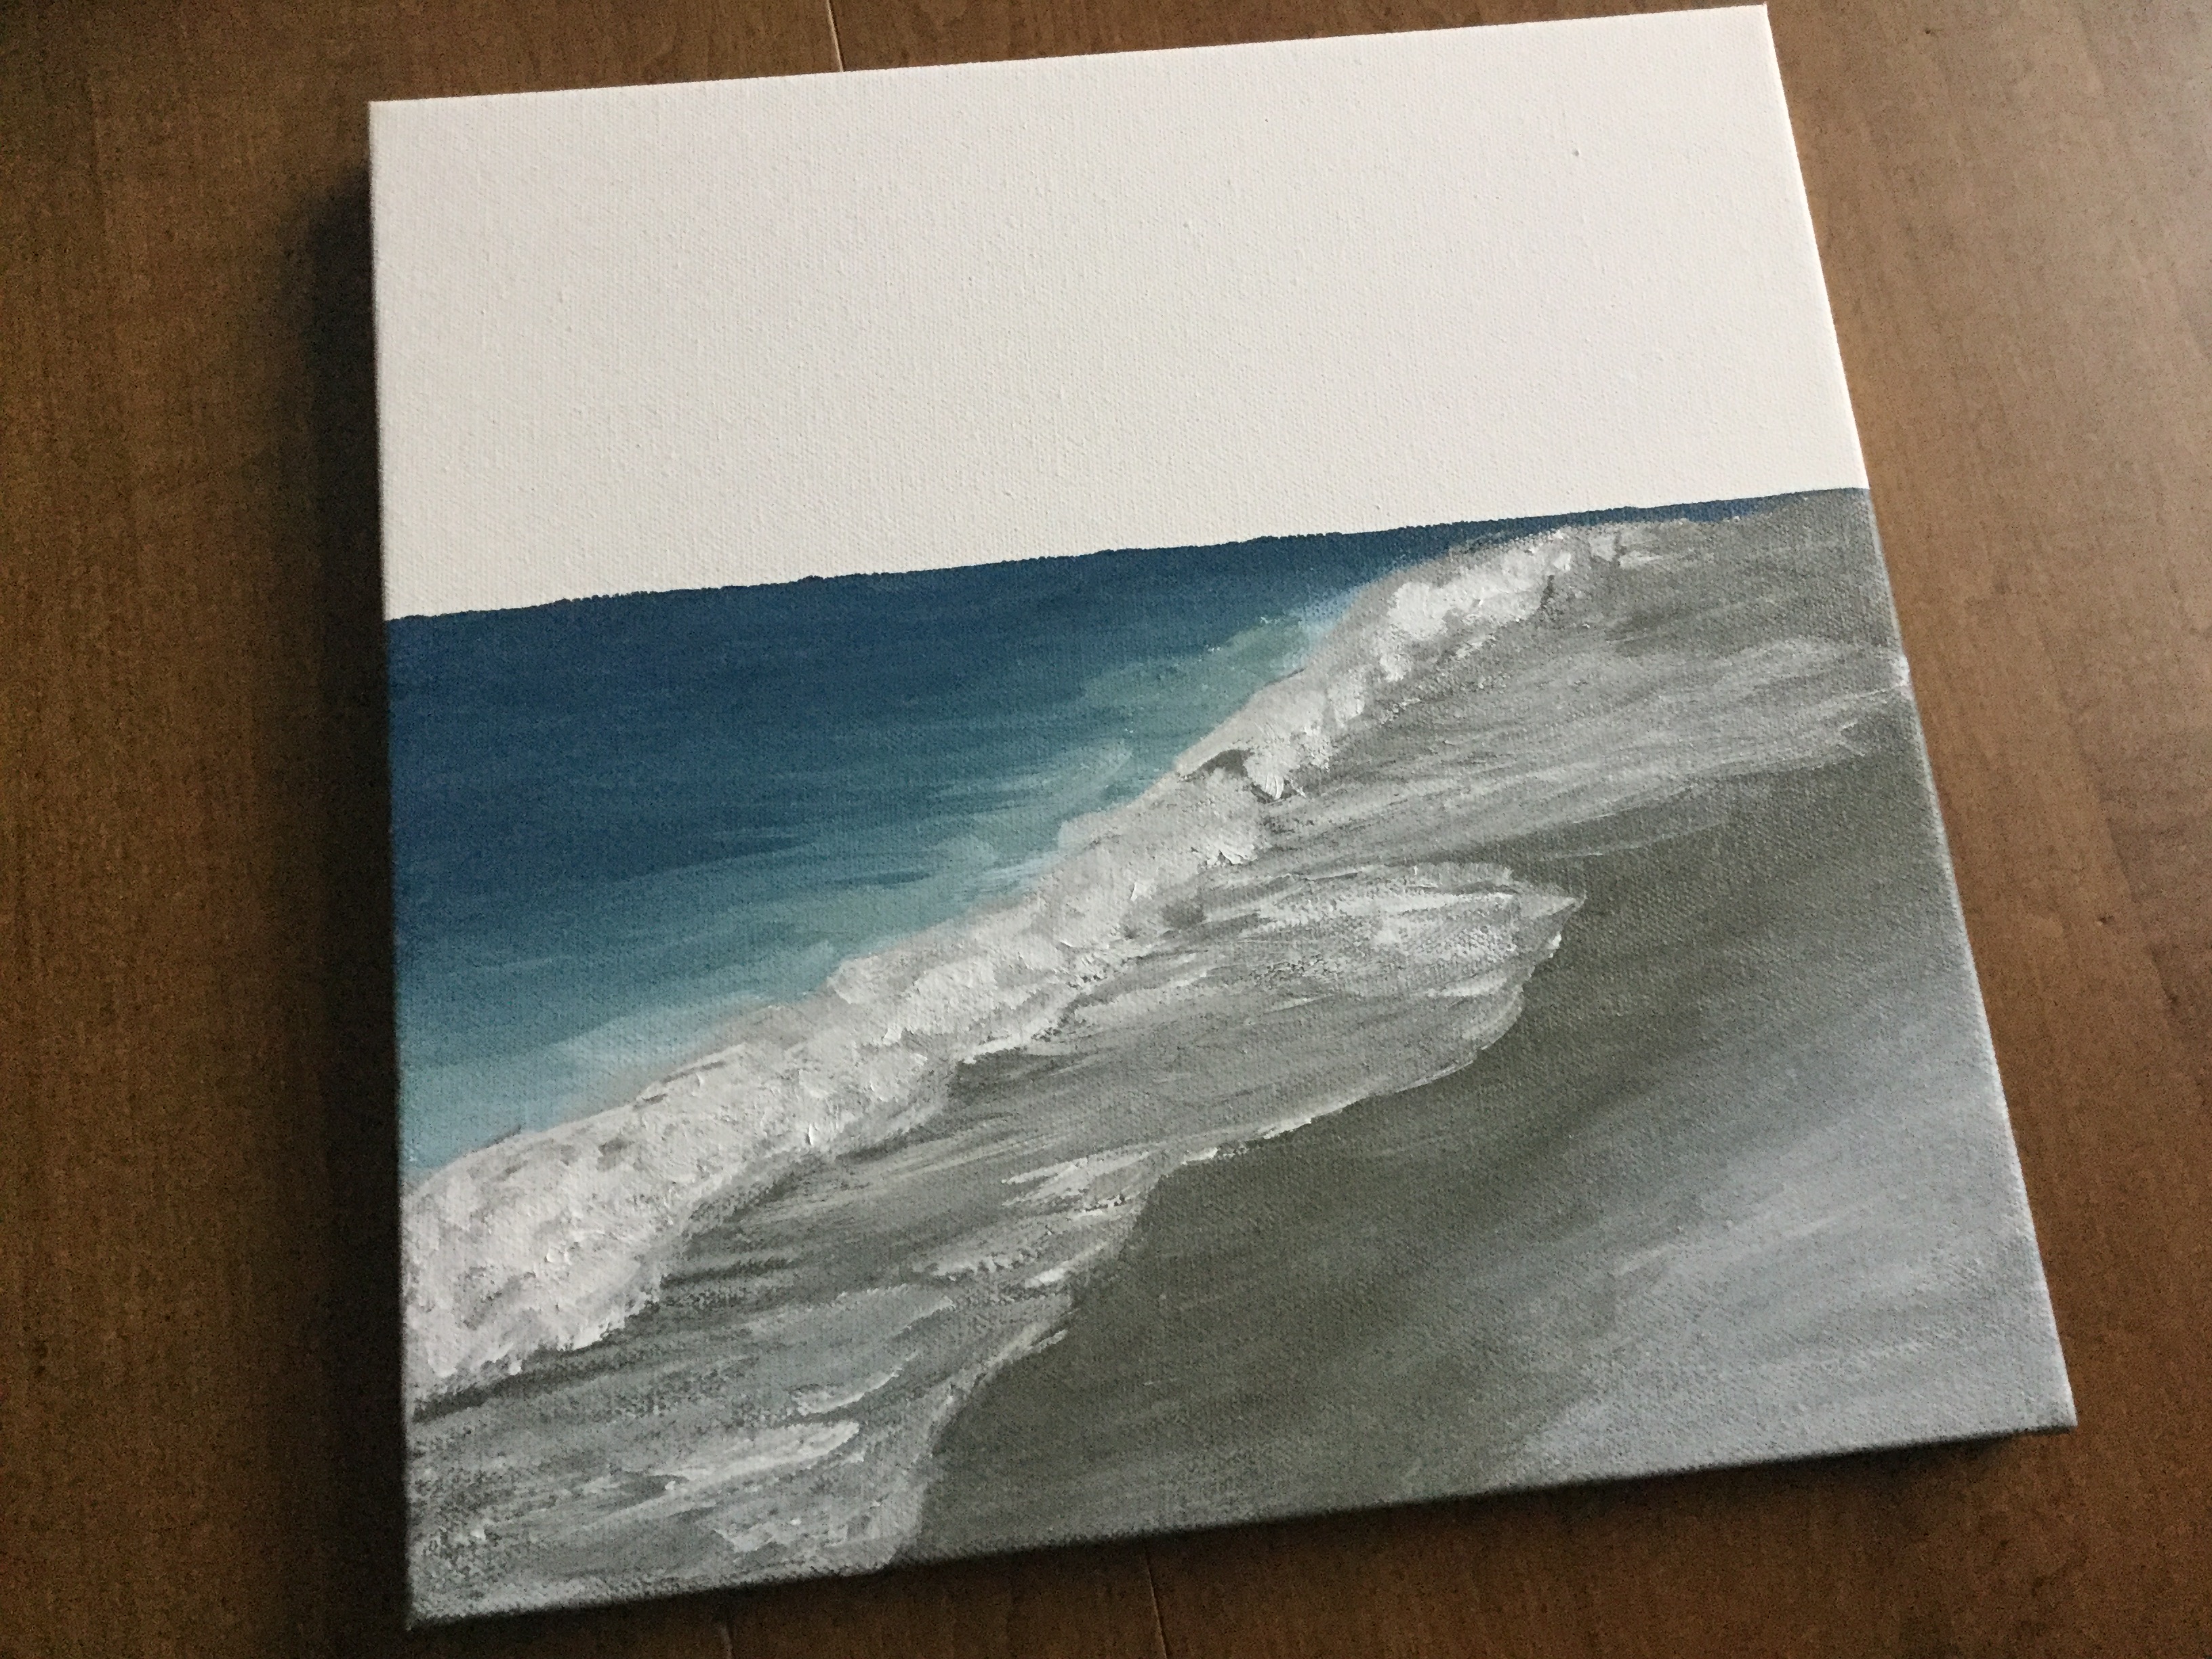
  3. Paint the ocean water closest to the horizon darker and bluer.
  4. Paint the water in the cresting wave lighter and greener.
  5. Paint the shallow water near shore brown.
  6. Paint the sand. The sand is darkest closer to the ocean where it is wetter.
  7. Paint the crashing waves with white.
  8. Paint the foam with white and a flat brush. Horizontal lines help this area appear flat.
  9. Add shadows to the breaking wave.
  10. Paint the sky as a blue fade that is lighter closest to horizon.
Acrylic Seascape painting

Tips for Painting Acrylic Seascapes

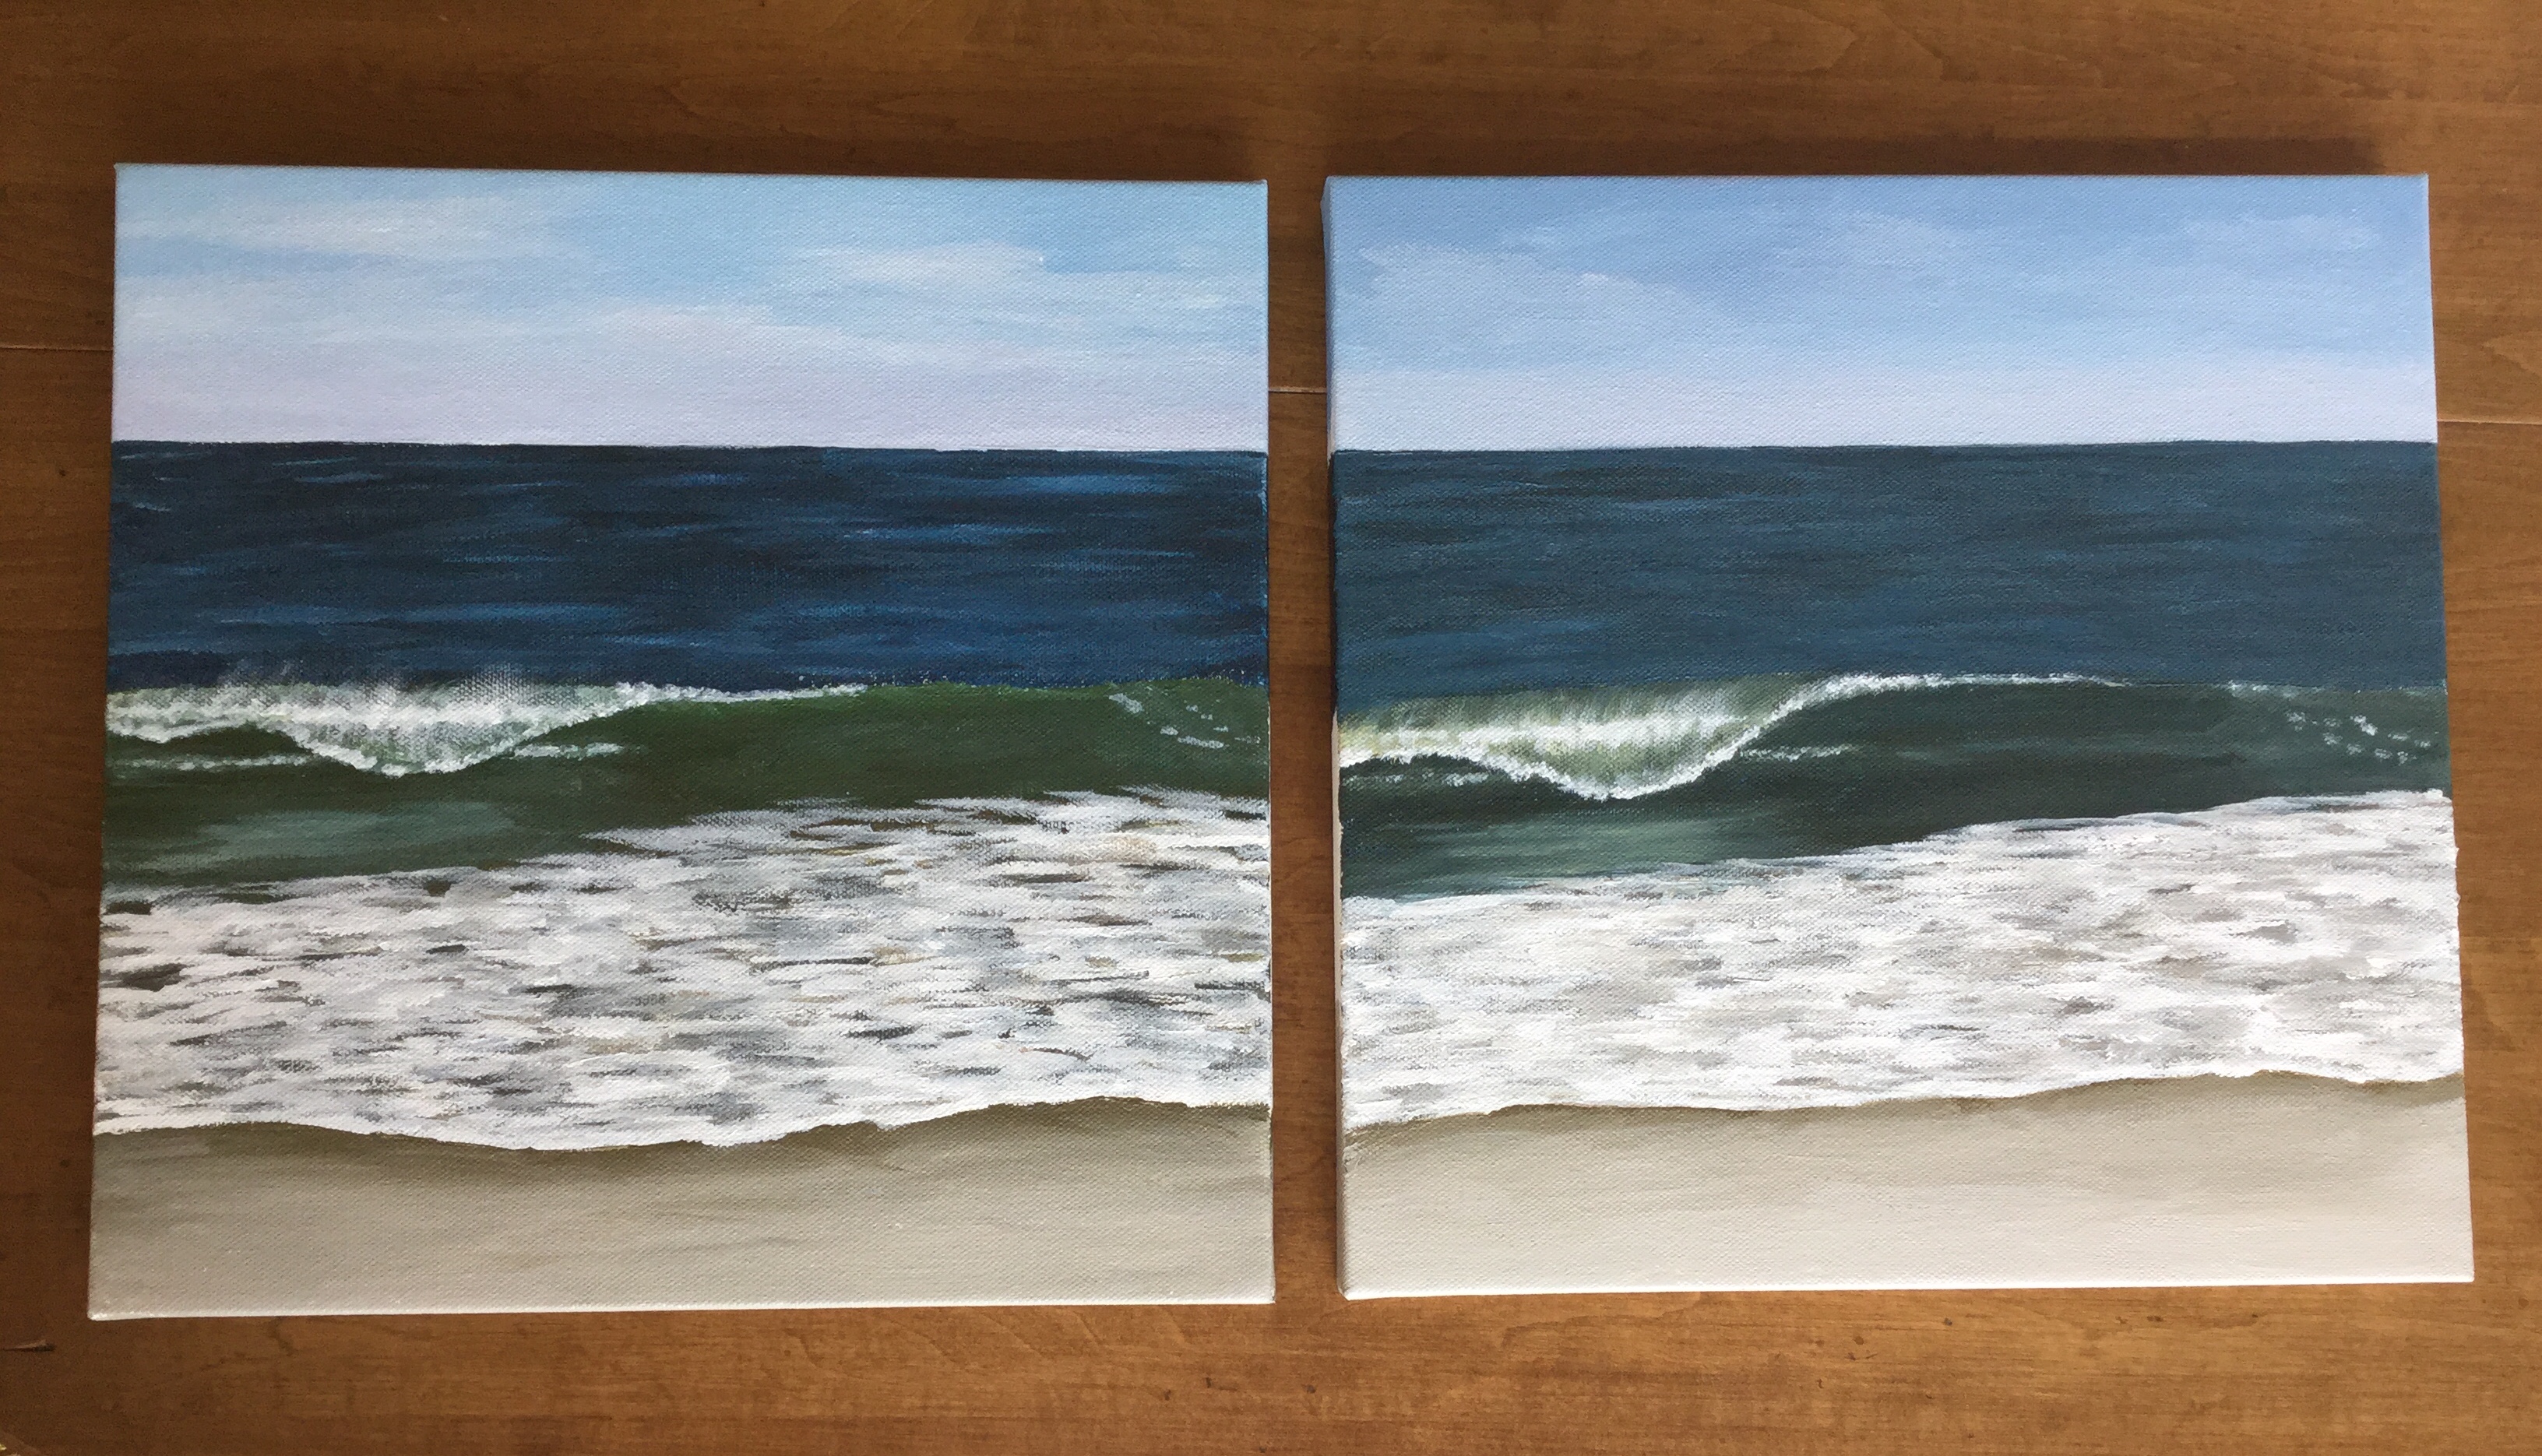
  • Study a reference photo to identify the details that will make your seascape more realistic looking.
  • Clouds in the sky – I used an acrylic gel medium to thin out the paint and overlay colors for a more transparent look.
  • Paint lighter areas on the ocean for the sunlight
  • A dry brush can help create the spray off a crashing wave
  • Use an art sponge to make the shadows in the crashing wave look more natural.
  • Add a dark line beneath the edge of the foam to make the foam appear thicker.
Art sponge makes more natural looking shadows when painting waves

Practice painting seascapes in watercolor with these tutorials:

I share my step by step process for painting watercolor seascapes in the following tutorials. Choose the format that works best for you:

Easy Watercolor Seascape online video lesson for beginners
How to paint the ocean in watercolor and gouache | tutorial | step by step instructions | painting tips
Watercolor Seascape Painting Tutorial

For a weekly dose of creative inspiration ~ Sign up for my weekly newsletter here.

This post contains affiliate links to products/brands I use and recommend. I earn a small commission whenever you buy using these links, at no additional cost to you. Thank you for supporting my blog!

Learning Acrylics

Acrylic seascape by Eileen McKenna

In May I switched from painting in watercolor to painting acrylic seascapes. I painted ten 12” x 12” canvases – intent on getting comfortable with the different medium. It was so frustrating in the beginning, but with each painting I learned something. I’ve pulled out the acrylics again – this time with bigger canvases, and I’m reminded of what I learned so far.

What I’ve learned about acrylics:

  • A coat of gesso makes the paint go on easier
  • When your brush starts to split – you need more water
  • When your brush is drippy – that’s too much water
  • Blend the colors next to each other for a more natural look
  • Blending works best when both colors are wet
  • It is better to work when the paint on the canvas is wet and you have plenty of your colors mixed and ready
  • Add highlights by adding white paint (or lighter paint) to your brush and blending it with the wet paint on the canvas
  • To thin the paint and overlay colors use  acrylic gel medium.
  • Use little canvases (or a canvas pad) to test color mixes
  • Painting in acrylic involves more set up and prep than watercolor. And more clean up.
  • Using a sheet from a palette pad – taped to your palette – makes clean up easier!
  • It is not as easy with acrylics to make a quick fix or change
  • Using painter’s tape for a straight horizon line presents some challenges. The paint can accumulate at the tape creating an edge.

Click here to view my collection of watercolor and acrylic seascapes.

Want a dose of creative inspiration? Sign up for my newsletter “My Creative Collection” by clicking here. Learn more here.

This post contains affiliate links to products/brands I use and recommend. I earn a small commission whenever you buy using these links, at no additional cost to you. Thank you for supporting my blog!

Teaching kids to paint watercolor seascapes

Watercolor seascape seashell wall hanging project

Last week I had the opportunity to teach kids ranging from 1st grade through high school how to paint the ocean with watercolor. The seascape painting was part of a 12” seashell wall hanging project to be completed over three days. I was excited but nervous.

Even though the kids were somewhat divided up by age – the age range was the biggest challenge. The kids were so sweet and I really enjoyed getting to know them over the course of 3 days. And their paintings (and projects) turned out amazing.

I had the whole project mapped out, which was helpful. Finishing early worked out fine, because I used the extra time to allow them to play and experiment with watercolor. Finding a few fun projects on Pinterest helped. What I would improve on next time would be setting up the project to allow them to work more independently – if possible.

I hope the kids had fun and have a new appreciation for watercolor.

Watercolor and my sketchbook

Mini watercolor seascapes
After a busy time, it feels good to be playing around with watercolor again. When I haven’t painted in a while it feels easier to dip my toe in by working in my sketchbook. At first I don’t know what to paint so I just doodle and play around. Usually inspiration strikes. I started painting a series of mini seascapes. I’m practicing for a workshop I’m teaching next week.

July is World Watercolor Month – learn more here.

Confidence in painting

Confidence in painting
The other morning I sat down to paint in an effort to turn my bad mood around. As I was painting, and not feeling great about myself, I was thinking how much confidence plays a part in painting. When you are feeling good, you are hopeful about the outcome of a painting as you work. But when you are feeling low, it’s easy for negative thoughts to sabotage your work. At these times it’s even hard to motivate to sit down and paint in the first place.

Thankfully, painting did help turn my mindset around and most of the things bothering me either worked themselves out, or proved to not be as bad as I let them seem.

A few days later I was reading Chip Gaines’s book “Capital Gaines: Smart Things I Learned Doing Stupid Stuff.” Chip, along with his wife Joanna, starred in HGTV’s Fixer Upper. Chip’s book is about their story, and is also very motivational. Because of my recent thoughts on confidence and painting, this quote really spoke to me:

Capital Gaines: Smart Things I Learned Doing Stupid Stuff

I’m glad that I sat down the other morning to paint despite my mood. I know that if you really want something, you have to work at it no matter what, and I’m trying to put that into practice. Check out Chip’s book here.

This post contains affiliate links to products/brands I use and recommend. I earn a small commission whenever you buy using these links, at no additional cost to you. Thank you for supporting my blog!

Know your Subject

Knowing your subject when painting | painting the ocean
I often think about an online class I took by Val Webb called “Drawing Children.” At the time, I was amazed at how well Val knows the nuances of the faces and figures of children. Now as I paint the ocean – almost exclusively, mostly in watercolor, but recently in acrylics – I think about not just the techniques to make the painting look realistic, but the characteristics of the ocean.

As I was painting the water, specifically the foam at high tide, I was painting and pulling back the strokes, because I was thinking about how the water is being pulled back by the tide. This is something you wouldn’t know just by looking at a photo. All the time I’ve spent at the beach might be making a difference in my painting. Last summer, after painting the ocean all winter, I looked and observed the water differently than before.

Work in progress where I was “pulling back”
Know your subject - painting the ocean

My son recently asked if I was going to paint anything else. I guess to him, every painting is similar. To me I’m learning with each painting. The ocean looks so different at different times and different angles. I’m sticking with the ocean, and I’m currently challenging myself by working to capture this amazing subject in acrylics.

Click here to view my collection of watercolor seascapes. Prints are available on watercolor paper or canvas, in many sizes.

Want a dose of creative inspiration? Sign up for my newsletter “My Creative Collection” by clicking here. Learn more here.

Comfortable with Acrylics

Going from watercolor to acrylics, painting acrylic seascapes
Starting this third set of canvases was the first time I felt comfortable – instead of frustrated – with acrylic painting. I was working on my first layer, blending all my colors on the canvas, and I had that feeling that I usually have with watercolor. It’s a happy, satisfied feeling, that what you are picturing in your mind is coming out on the canvas. I’m learning how to work the acrylics. I’m getting it. The first layer of this painting felt like a break through.

The first layer:
Going from watercolor to acrylics

What I’ve learned about acrylics so far this month:

  • A coat of gesso makes the paint go on easier
  • When your brush starts to split – you need more water
  • When your brush is drippy – that’s too much water
  • Blend the colors next to each other for a more natural look
  • Add highlights by adding white paint (or lighter paint) to your brush and blending it with the wet paint on the canvas
  • Use little canvases (or a canvas pad) to test color mixes
  • Painting in acrylic involves more set up and prep than watercolor
  • It is not at easy as watercolor to make a quick fix or change
  • It is better to work when the paint on the canvas is wet and you have plenty of your colors mixed and ready

Click here to view my collection of watercolor seascapes. Prints are available on watercolor paper or canvas, in many sizes.

Want a dose of creative inspiration? Sign up for my newsletter “My Creative Collection” by clicking here. Learn more here.

The second set of Acrylic Seascapes

Transitioning from watercolor to acrylicTransitioning from watercolor to acrylic
With 10 sets of 12” square canvases to complete this month, I have many paintings in various stages. For these 2, the second set of my acrylic canvas challenge, I wanted to add more lights and darks within the green of the wave. (See before below).
From watercolor to acrylic. Seascapes
I’m learning that with acrylics, it is better to work on a whole area of a painting to better blend the paints and create highlights and shadows. To do this, you need all those colors mixed and ready. I realized this yesterday when I tried to just add some highlights. Without the dark paint to blend into, my quick tweak didn’t go well.

Today I sat and mixed the paints and worked on finishing these. I was beginning to regret fussing with the paintings at all – you fix one area, and sometimes ruin another. At a certain point you have to call a painting done, and take what you learned to the next painting. Overall I’m happy with my progress so far this month.

Click here to view my collection of watercolor seascapes. Prints are available on watercolor paper or canvas, in many sizes.

Want a dose of creative inspiration? Sign up for my newsletter “My Creative Collection” by clicking here. Learn more here.

Blending and fading colors in acrylic paint

Blending colors in acrylic paint
I was so excited to start the second set of acrylic canvases, I dove right in Saturday morning. I had been mulling over what was bothering me about the first set of canvases, as well as what I learned, and I realized these two things perfectly intersected.

I learned about blending and fading color in this video and then saw Katie Jobling painting a wave in this video. My main complaint with my first set of paintings was that the wave and water behind it looked flat. It looked like a solid block of color. I wasn’t successful in adding highlights and darks to it. What I realized was, I needed to paint, from the beginning, a background that wasn’t solids, but blends. And from there I can add more detail – by adding more blends on top.

Blending the colors is working great so far. I’m really happy with my first layer. It is still a challenge mixing the right colors. I don’t like to work straight from the tube as the colors don’t look as natural. I’ve gotten pretty good at mixing colors in watercolor to achieve the palette I want. I’ll keep trying in acrylic. I do need to use more paint! I tend to mix too little. I’m used to watercolor paints where a little paint goes a long way.

For this set I have my reference photo out, so I can look at the highlights and shadows as I paint the blends. I didn’t refer to the reference photo much for the last set, because I wanted the painting to be a little looser. But I think I ended up missing a lot.

Click here to view my collection of watercolor seascapes. Prints are available on watercolor paper or canvas, in many sizes.

Want a dose of creative inspiration? Sign up for my newsletter “My Creative Collection” by clicking here. Learn more here.