10 ways to find inspiration for your creative projects

10 Ways to come up with ideas for your creative projects
I originally wrote a version of this post just one month into my creative resolution. Almost two years later, many of these ideas still work for me! The biggest change since then? The inspiration I get from others through social media.

Ten ways to find inspiration for your creative projects:

  1. Scroll through your feed or do a search on WordPress, Instagram, Pinterest, etc. – there is so much to look at and be inspired by!
  2. Take a walk. Whether it is a walk in a nature preserve, along the beach, or through the neighborhood, you’ll notice things you’d never see driving by. And if you see something inspiring – take a picture!
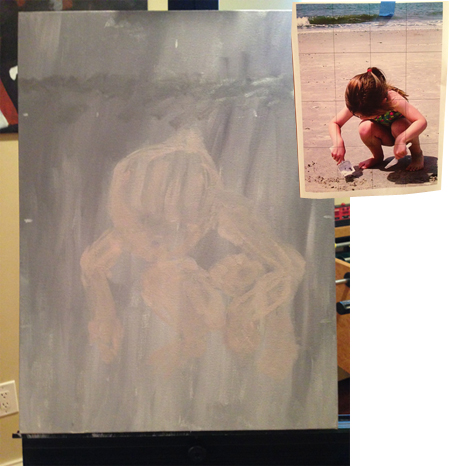
  3. Find a photo. Look in magazines, catalogs, or your own photo library. Keep photos you like in a folder or hang them on a corkboard. Search Google or any social media. Virtually save links using tools like Pocket or pin stuff to your Pinterest boards. See mine here!
  4. Go to the library – where there is an endless supply of art and how-to books, and magazines on any subject.
  5. Learn about other artists. I love reading about other creative people, no matter how different their craft is. Each artist’s creative process, and how they got their start is so interesting. (Two great podcasts for this: What’s your story and While She Naps.)
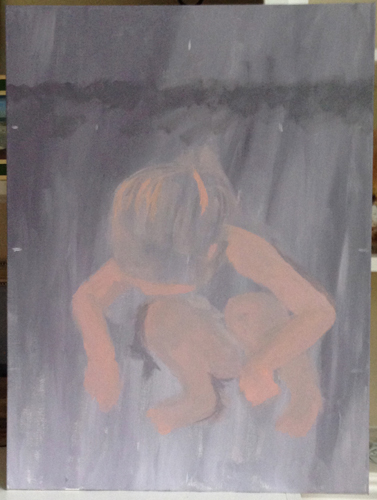
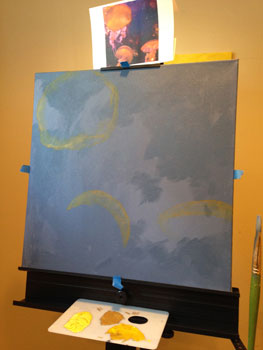
  6. Just start. Once I get started drawing or painting, the ideas come. Sometimes ideas come to me, by just setting up!
  7. Keep a list of project ideas. I keep a notebook with an ongoing list of ideas and refer to them when I’m stuck.
  8. Look through old sketchbooks. I try to keep everything, because I enjoy seeing the progress I have made. Sometimes I find the start of an idea.
  9. Have coffee with friends. Find a creative friend, or two, and get together with them. When you share your ideas with others, you can get great feedback, and different points of view.
  10. Sit outside. I am so inspired by the Seasons – Spring flowers, the beach in the Summer, Fall leaves. I’m even inspired by the bare trees against the Winter sky.

Ideas can come at any time from unlikely places. Soak them up! I’ve gotten ideas for paintings while watching TV, eating breakfast, etc.

Read –

19 Books for Creatives

What I’ve learned about art (and myself)

eye
In the last six months, I’ve been on a creative journey. Here are the things I have learned through my creative resolution:

  • Every time I sit down to paint, draw or create – whether it’s a success or failure – I learn something.
  • Looking back at my lists of project ideas, helps me stay focused and complete things. And feel a sense of accomplishment about the things I can check off!
  • Even the most common objects can be interesting subjects – a bottle of windex, the vacuum – lol!
  • Trying again. A couple of times I’ve tried to redo a painting. The second painting wasn’t necessarily better – but you I improved certain things (and lost some things). It is interesting to compare and analyze. A great learning tool!
  • To post or not to post? I went ahead and posted something I felt I had overworked and was honest about it. I loved the feedback I got!
  • A weekly checklist is helpful to cover all the things I want to work on. (But it is okay, every once in a while, to throw it out the window and work on what I feel like!)
  • Learn everything you can when you visit the art store. Look at their website for even more product information.
  • Disposable palette sheets are awesome. Quick clean up, plus I write what paint colors and mixes I used, for future reference.
  • Bloggers are so nice and supportive. Thank you!!! 🙂
  • The resources to learn from other artists are everywhere – blogs, videos.
  • Mixing colors leads to a less saturated color. For vibrant, bright colors – use colors directly from the tube. (It took me a whole painting to learn this!)
  • Developing a style takes time and practice.
  • A project can spark the idea for the next project, and so on and so on!
  • Sometimes I have to force myself to finish. I would love to start new projects everyday. It is fun and exciting, but sometimes I have to buckle down and finish the lingering ones. The feeling of accomplishment is amazing!
  • Hanging my paintings makes me feel good! 🙂
  • Take the pressure off. I don’t sit down to create a “frameable” piece. That paralyzes me! I sit down for a “5 minute sketch” or to play with watercolor.
  • Be open to inspiration – it is everywhere!
  • Dedicate time to being creative. Schedule time, to make sure it happens. Life can easily get in the way.
  • Step away. With a fresh eye, I notice things, I wouldn’t have, when I was deeply involved in the painting or sketch.
  • Try new things. Whether it led to success or failure, I’m growing from trying new things.
  • The computer can be a useful tool – for planning out projects, for analyzing color, etc.
  • Keep track of paint mixes for the next painting session. I found keeping a little leftover, a paint “starter,” is helpful.
  • Painting sand is very hard. Sand is many different colors and textures and changes color as you get closer to the ocean. I’m still working on this!
  • Getting back into a project, after a lot of time has past is difficult. I’m afraid of ruining it and I forget where I was. BUT, once I get started on it again, I can quickly get back into it!
  • Keeping a blog is an amazing motivator and I can look back and see what I was thinking and working through during each creative project!

Painting a Figure (Little Girl Digging – Part 2)

girl digging step 2
It’s hard getting back into a painting when a week or more has past! I’m so glad I made notes on how I mixed the colors and saved some of each color. It reminds me of a bread starter – not that I’ve ever used one! I added a little bit of my saved color to my new mixes to keep some continuity. I mixed a skin tone color that isn’t as subtle as before. [Not a perfect match – but at this point I’m not going to over think it. I’m focusing on getting the Little Girl’s figure right.] As I painted Little Girl’s body with the new color, she is popping out of my background (above). I tweaked her shape as I painted. See how subtle she was when I started:
girldigging

A few days later, I mixed a lighter sand color and added it to my canvas. Still focusing on Little Girl’s shape, I used the sand color to edit her shape as needed.
girl digging step 3

I’m getting there – slow and steady! lol. Read my previous post – Painting a Figure (Little Girl Digging – Part 1) and see how I started this painting.

Defining paint color with help of the eyedropper tool (in Photoshop)

It has been three weeks since I last worked on my jellyfish painting. Isn’t it ironic that when I last worked on it, I wrote about it under the title, “Procrastination and Painting.” Seems like I’ve been procrastinating getting back to this painting! I know the reason why. I hit a stumbling block.

I was struggling with the color of the jellyfish. What I ended up with was a very orange color. No matter how many times I mixed it, I couldn’t get it to look like the photo. When I left off, I planned to use the eyedropper tool in Adobe Photoshop, to help pinpoint the colors in the photo. It certainly seemed like a good plan. Let’s see if it actually works!

jelly1

When I opened the photo in Photoshop and starting clicking around on the jellyfish photo, I was surprised to see the colors that came up – maroon, brown, tan, gold. I already felt that it was helping me “see” colors in the jellyfish that I wasn’t seeing. Since I use thalo blue, cadmium yellow and cadmium red to mix my colors, I decided the RGB (red, green, blue) breakdown of the colors was the most useful. I tried to mix and measure following this breakdown.

eyedroppertool

mixnew

My first try wasn’t great. I mixed a color which seem to match, but when I painted on top of my existing color, it didn’t look great. I guess the fact that I was painting on top of color, was an issue. The orange beneath my new color, was having an effect on the new color. I didn’t give up!

jelly2

I kept mixing colors until I got something, that when I put it on top, it looked right. I feel like I’m starting to get there, but have my work cut out for me. I’m so inexperienced I pick hard things and don’t realized they are hard until I’m in the middle of it.

jellylast

The thing that I love about this photo is that it glows. The colors in my painting are dull and I’m not sure I can fix it – if I’m mixing the colors. Tomorrow I have off and I plan on attacking this painting to see what I can do!

jellyfish

Ice Cube Watercolor Palette

Ice Cube Tray Palette 2Yesterday, as I set up for my “winter” watercolor I had the best idea. Now, you may not know this but, I recently scrubbed my watercolor palette and set up my paints in the order of the color wheel. Most of the colors were straight from the tube, but I mixed a couple of them. (My palette has sponges that keep the paint from drying out.)

With this setup, I’m ready to paint. I can sit down and paint in my sketchbook without pulling out the tubes and squeezing out paint. The only hiccup is when I need to mix a custom color. I don’t want to dirty my palette! I was able to get away with mixing on a piece of tinfoil, but now I was anticipating mixing several colors. I didn’t want pieces of tinfoil all over the place.

I remembered an ice cube tray, long abandoned, in the back of the corner cabinet, where no one can reach. When I pulled it out, I was excited to see it had 3 rows!

As I rinsed it out, I decided to keep water in the top row. I mixed paint in one of the bottom row cubes. I took some of that paint and put it in the cube above it, and added a little water. Then I cleaned my brush in the top cube – the water cube. I now had, a row of cubes, all the same color, in varying degrees of wetness! Awesome!

I set up rows for the other colors I needed and started painting. It was great. I had 3 options to choose from for each color. It worked like a charm. I’ll use my ice cube palette from now on!

The paths our art projects take us on

Yesterday, as I thought about the “abstract” painting I just finished, I thought that it would be cool to paint something similar, but use the colors of sunrise/sunset – pink, orange, purple. I would love to blend them together in the background, the way they blend in the sky. I couldn’t wait to take pictures at sunrise, to use for reference. And, I was excited to paint another tree, to use the techniques I just developed.

sunset

It’s funny, how a project can start us on a path. A path similar to the branches of a tree. The path may be fairly straight – projects similar to one another. Or the path may be twisty – each project taking a unique turn. The path can be long – each project sparking the idea for the next one. Or the path may be short – as we experiment with something that doesn’t work out or fails to inspire us any longer.

We follow a path until it ends. Until we have reached the end of that train of thought. At that point, we forge a new path, based on something different that inspires us. But each path we take, is related to the others, just like the branches of a tree.

branches4

Procrastination and Painting

Today was the first day, in weeks, that I’ve had a quiet house, all to myself. The kids were at school, and my husband was at work. Perfect day to paint, right? Right! After a second cup of coffee, it was time to get started.

But, first I had to clean out my pocketbook, throw in a load of laundry, clean my palettes, find tissues, and search for ‘8os music. What? It seemed like I was doing everything to avoid starting. And the ’80’s music? I have no idea, where that, came from. But, after I got a pandora station playing ’80s alternative music, I was a happy camper and got to work. (After I found hand cream and cleaned the papers off my desk!)

Over the weekend, I painted a purple/blue medium tone for the base coat of my jellyfish painting. As I mixed the color, I thought, “How much should I mix?” Ironically, I had to mix the color, no joke, four times. I, obviously, underestimated how much paint, the raw canvas needed! The color wasn’t the same every time I mixed it, but the base color will be covered, for the most part.

As I worked, I focused on being neater. I took the time to set up the area around my easel. Each time I work with the easel, things go smoother. But, the easel is still a little unstable. Could it be that extra screw, I didn’t use?! Read my recent post and you’ll see why I don’t read instructions! Part of my homework for next time is to fix this problem.)

As I was mixing my colors (from thalo blue, cadmium red, and cadmium yellow), I realized that I may not be able to achieve the electric purple in the photo. I may have to incorporate a premixed color. Not only was I struggling with the background color, I was struggling with the color of the jellyfish. I printed a reference photo and marked a simple grid on it. On my canvas, with painters tape, I marked the same halfway points. I wanted to make sure that the jellyfish, were in the correct spots. I “sketched” the shapes of the jellyfish (using paint).

jellyfish2b

I may have procrastinated starting, but time flew as I worked. I painted for almost two hours, and I think I accomplished a lot. I didn’t achieve the bright purple background color, but I’m happy with the color I have.

jellyfish3

I was so focused on cleaning up, that I almost forgot to write my plan for the next day. Through the process of writing this blog, I’ve come to realize how important, for me, a plan is. For the jellyfish painting, my plan is to work on refining the color of the jellyfish. Since I’ve been struggling, I’m going try using the eyedropper tool, in Adobe Photoshop, to help me pinpoint the colors in the photo.

Do you paint flat or use an easel?

easelnew
With a background in drawing and painting in watercolor, I was used to working flat at a table. When I showed up for my first acrylic painting class, I was (almost) surprised to find that everyone had an easel to work at. It felt strange painting at an easel – holding my arm up in the air. After the class ended, I continued to paint more and more in acrylics, always flat on a table or on the floor. I began to wonder if I should be using an easel. Some online research (on http://www.about.com) revealed some interesting points including, “work vertically, because the painting will be displayed vertically.”

Things to consider when deciding to work flat vs. at an easel:

  • How large do you work? It’s easier to work on an easel with larger paintings than a table.
  • Viewing your painting. You can back away from an easel, to “take in” and view a painting, especially the larger ones.
  • Do you add fine details? I find it easier to add details when the painting is flat and I can lean on the canvas.
  • Acrylic vs. oils – Oils take longer to dry and dust can be an issue as it dries when a painting is laying flat.
  • Do you have a dedicated space for an easel?

I invested in an aluminum easel. It’s lightweight but sturdy and folds up for storing. Learn more here. It looks so professional, and I love displaying my latest painting on it! There’s even an arm that extends to hold my brushes and palette!

Want to explore creativity? My new ebook takes you step by step through the process for introducing regular creativity into your life, finding inspiration, and exploring mediums. Learn more about Creative Exploration: A Six Week Process for Introducing Regular Creativity into your Life by clicking here.

Creative Exploration book -

creative newsletter featuring artists crafts tutorials books shows and more | creative inspirationBeginner Watercolor Painting Instructional PDF "What you need to know to get started with Watercolor" Beginner Printable Introduction Easy Starfish Watercolor Painting for Beginners | Learn Watercolor Techniques

I want to hear from you! How do you prefer to work?
(To date, 90 people have completed this survey and 79% prefer to work flat.)

This post contains affiliate links to products/brands I use and recommend. I earn a small commission whenever you buy using these links, at no additional cost to you. Thank you for supporting my blog!

Coming up with ideas and finding inspiration for art projects

Although the other day, my breakfast – a sliced apple, inspired a new art project, ideas are not always so easy to come by. I sometimes get frustrated, when I want to work on a project, but don’t know what to do, or where to start. Here are some things that help me, when I have “artist’s block.”

  1. Take a walk. Whether it is a walk in a nature preserve, along the beach or through the neighborhood, walks can help you see things, you normally don’t have time, to notice. Take a picture! I’ve created several projects based on things I’ve seen on walks – a weathered fence, a zigzagging beach fence, a shell. On a route through the neighborhood, I see an old weathered garage, that reminds me of a barn. I’m often tempted to draw or paint it and add in a horse.
    beachfence
  2. Go to the library – an endless supply of art and how-to books, and magazines. I have to admit, the library is one of my favorite places. I often go there and sit down with my favorite magazine, “Country Living.” It definitely inspired me, during my “rooster” phase. Why else, would a girl, from the suburbs, paint and draw so many roosters!
    rooster2
  3. Find a photo. Look in magazines, catalogs, the internet or your own photo library. We can’t always photograph, every idea we have. Stock photography websites, allow you to “search” for photos of specific things. Tear out and keep photos, for future projects, when you see something that catches your eye.
  4. Read about other artists (in books, magazines and the internet). I love reading about other creative people, no matter how different their craft is. There is something inspiring about people, who focus and succeed at what they love. I aspire to be that type of person. I love learning about each artist’s creative process.
  5. Just start. Sometimes it helps, to just get started. Start doodling or painting and see what evolves.
  6. Keep a list of ideas. Without lists, I would forget all my ideas. I recently came across a list, that included the word “jellyfish.” It reminded me of the cool jellyfish I took photos of, at an aquarium, and wanted to paint.
    jellyfish
    I make lists on scrap paper all the time, but now I’m trying to use a notebook. This way, all my lists are together and I won’t lose any great ideas. I often thumb through my notebook, to look back on what I’ve written. I feel very accomplished, when I can check off a project I’ve completed.
  7. Look through old sketchbooks. I try to keep everything, because I enjoy seeing the progress I have made through the years. Sometimes I find an incomplete project or an idea, that I never fully developed.
  8. Have coffee with friends. I am lucky enough to have two great neighbors. I always feel inspired after getting together with these special friends. I hope I inspire them, and encourage them, half as much as they do me! They give me the positive reinforcement, I sometimes need. (Anyone out there want to leave a comment? please? lol!) Find a creative friend, or two, and get together with them. When you share your ideas with others, you can get great feedback, from different points of view.
  9. Go shopping! Walking through a home store, art store, or even a garage sale can inspire me. Whether I get a specific project idea or just get excited to work on something, it feels good.
  10. Go outside. When the weather is nice, I often sit outside, and sketch leaves, flowers, etc.
    redcoreopsis
  11. Keep your eyes open. Ideas can come, at any time, from unlikely places. While watching TV, I saw a painting of an orange slice, on Modern Family (in Gloria and Jay’s house) and was inspired. I decided to work on an orange slice of my own, which led to limes and, currently, an apple slice.

It’s funny, sometimes there isn’t enough time, for all the ideas and projects I want to work on! How do you come up with ideas?