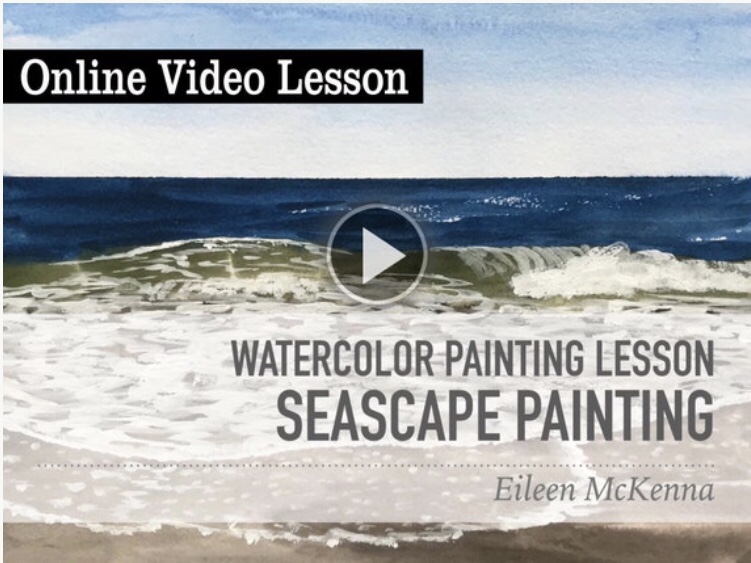
I originally planned to write about looking towards fall, but after scrolling through my photos I was inspired to paint a seascape and sunset. Thankfully, even though we are away, I had my supplies with me and some time to sit and paint. I haven’t painted enough lately and it felt SO GOOD.
In NY the weather has been spectacular. Without the oppressive heat and humidity we’ve had some beautiful “top notch” beach days. And what’s more inspiring than standing in the surf watching the waves roll in?
Soon enough the blue, green and brown color palette will be replaced with red, orange and yellow. For now I’m holding on to summer a bit longer.
Summer inspiration – standing in the ocean watching the waves roll in.
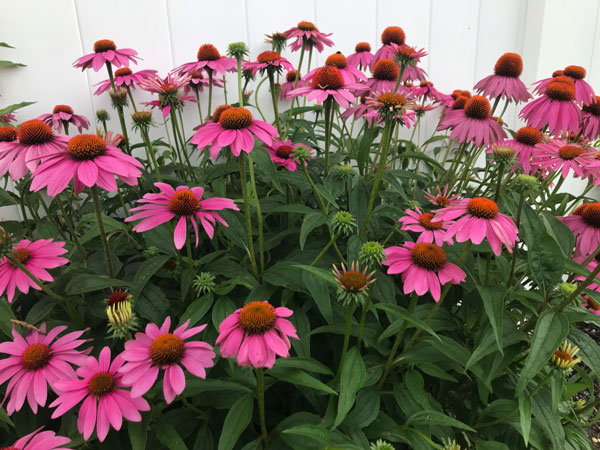
It’s that time of year when the gardens are blooming! They are at their peak, before the August heat starts to take its toll. I love taking lots of pictures to use as reference for future paintings. I’m like a squirrel stocking up for winter. I’m storing creative inspiration on my phone for the winter months.
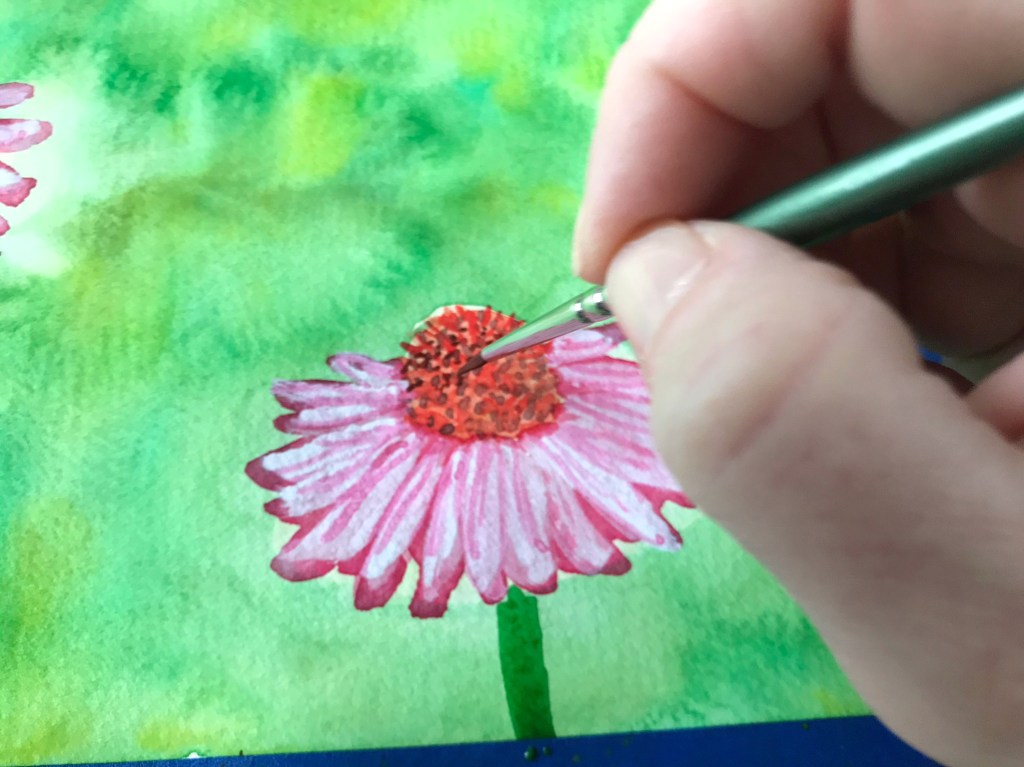
I’m in awe of every hibiscus bloom we get. I’ve made several attempts to paint them. And the coneflowers – Echinacea – are one of my favorites. Last spring I created a new printable tutorial if you’d like to give coneflower painting a try!
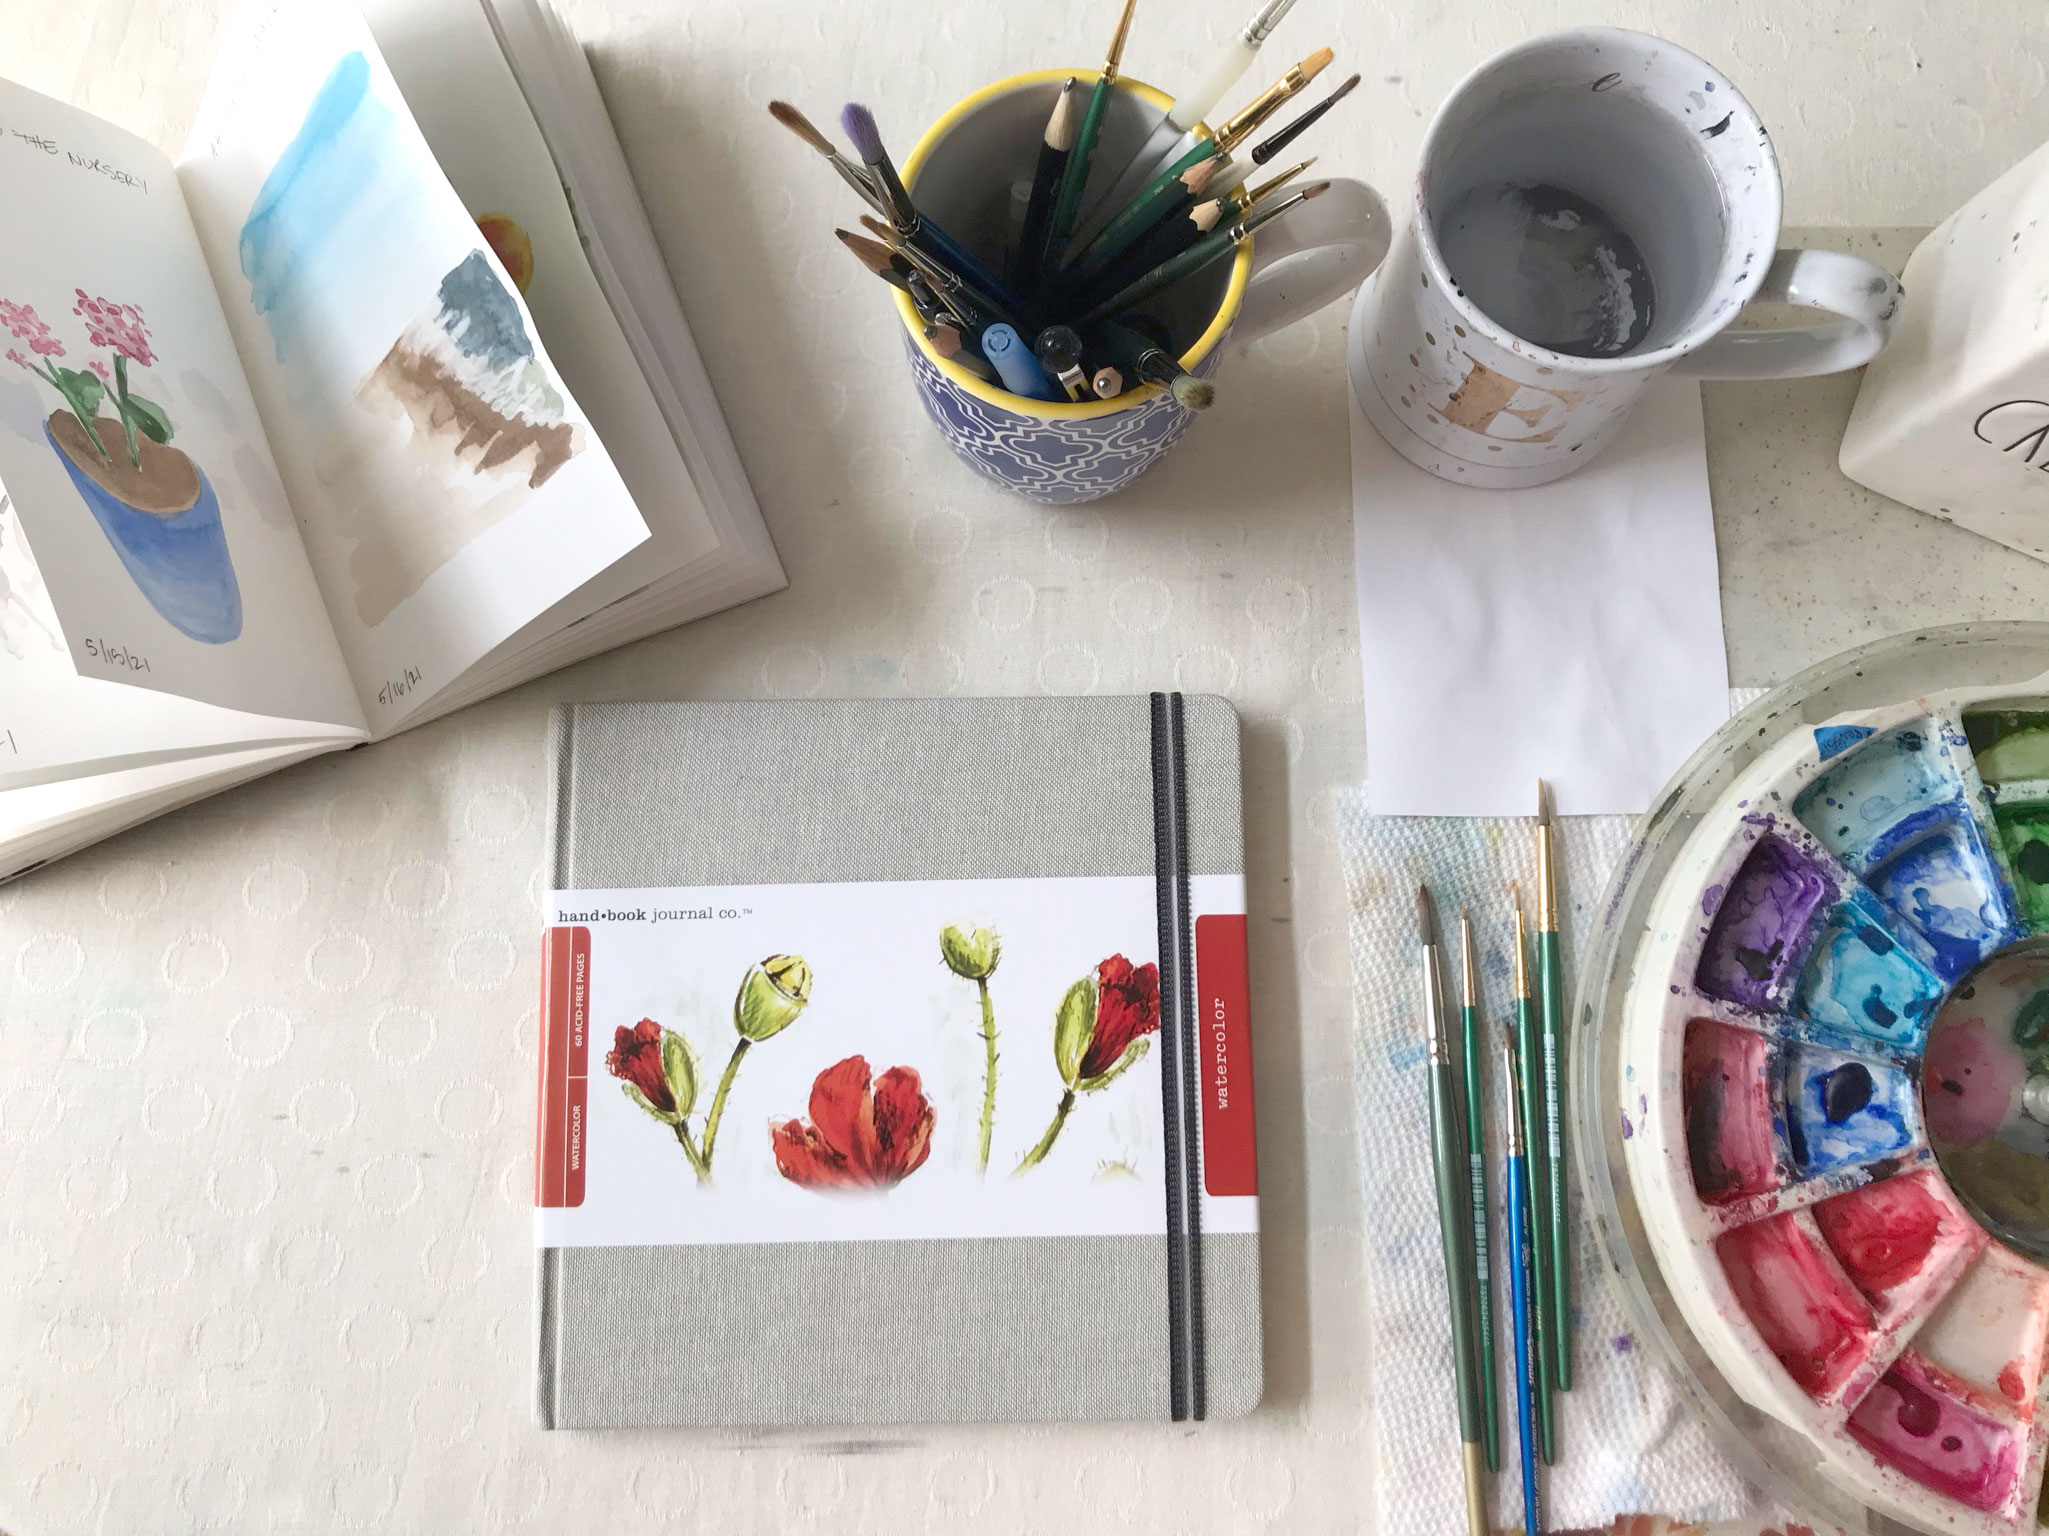
I am having so much fun filling my watercolor journal by painting every day – or almost everyday – no one is perfect right? My pages are of the moments of joy I experience each day. I call my watercolor journal project “Finding Joy” and it’s been a great source of positivity in my life these last two months. And it’s great to paint almost every day.
Thinking of doing your own watercolor journaling? Here are my reviews on several watercolor journals.
The size: 5.5″ x 8″. I liked the small size of this book
The paper: 90 lb. mixed media paper. The paper can withstand some “working” at it – meaning you can apply the paint, lift the paint, add more paint without the paper starting to crumble.
The binding: The book doesn’t lay flat but I used binder clips to keep the pages secure while I was painting.
Cover: The cover is a bit flimsy and rubbery.
Pages: 64 pages. The pages are white which is good as I’m not a fan of off white paper.
Overall I really liked working in this book. If I wasn’t gifted a different journal I probably would have ordered another one of these.
The size: 8.25″ x 8.25″ square. I always liked working with square paper!
The paper: 95 lb. watercolor paper.
The binding: The book lays completely flat.
Cover: Linen hardcover.
Pages: 60 pages. The pages are white which is good as I’m not a fan of off white paper.
Extras: A ribbon bookmark and clear pocket on back inside cover.
So far so good! I just started working in this journal. The cover is beautiful, the pages are spacious. The book feels special. Laying flat is a nice bonus.
Join my email list for weekly watercolor tips and tricks and creative inspiration!
Sign up and receive the “Watercolor Basics” free pdf:
Processing…
Success! You're on the list.
Whoops! There was an error and we couldn't process your subscription. Please reload the page and try again.
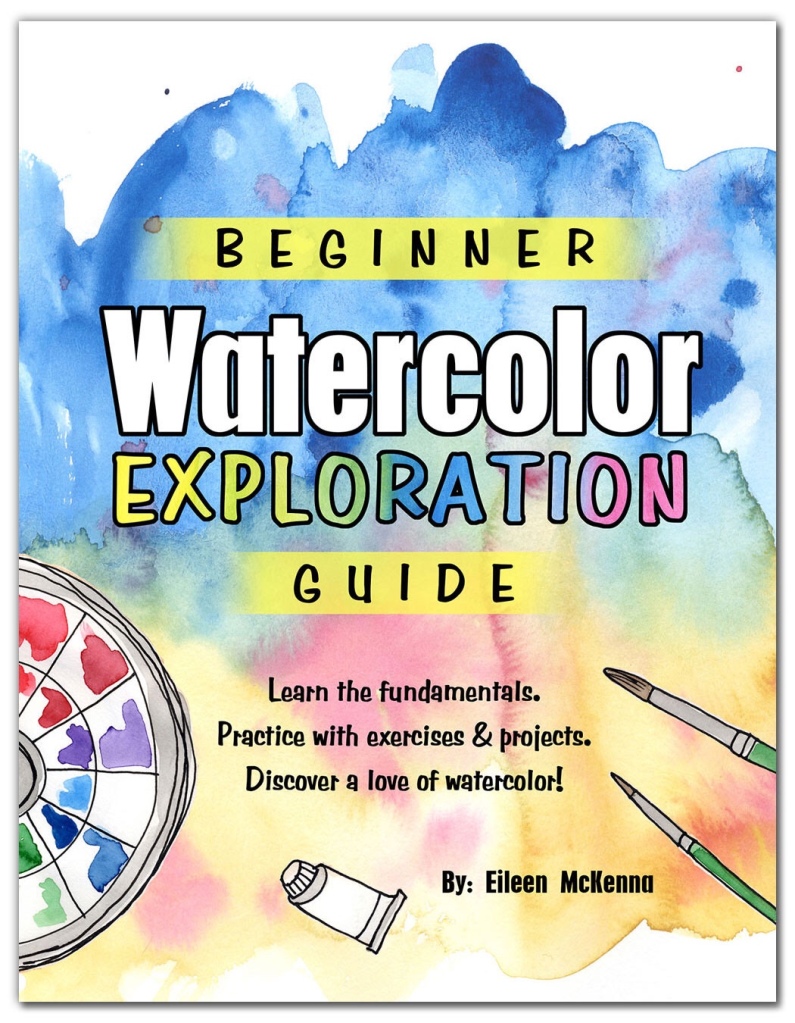
looking for a comprehensive introduction to watercolor? This guide is for you!
This Beginner Watercolor Exploration Guide is the perfect introduction to watercolor. Each fundamental is explained and then you practice it with exercises and painting projects.
The 5 tutorials build upon one another as you progress through the guide. You go from beginner brushstrokes to a watercolor seascape!
This posts contains affiliate links to products/brands I use and recommend. I earn a small commission whenever you buy using these links, at no additional cost to you. Thank you for supporting my blog!
Watercolor is a fun, convenient medium. It’s easy to set up and clean up. If you are just getting started with watercolor you may be wondering…
What supplies do i need to paint in watercolor?
There are several things you need to paint in watercolor – some of which you have around your home! Here is what you’ll need:
Watercolor paint (see below for specifics)
Watercolor brushes (see below for specifics)
Watercolor paper (see below for specifics)
Cardboard larger than your paper
Painter’s tape to tape down your paper to the cardboard
Container of water
Paper towel
Scrap paper
Palette to mix paint with water or mix colors – try the top of a plastic egg carton
You are probably wonder – Ok, but what kind of paint, brushes and paper? I’ve created a FREE downloadable pdf – “Watercolor Basics” – that covers what kind of paint, brushes, and paper you should use.
sign up here to receive the “Watercolor Basics” free pdf:
Processing…
Success! You're on the list.
Whoops! There was an error and we couldn't process your subscription. Please reload the page and try again.
How should I set up my supplies?
Now that you’ve collected all of your watercolor supplies, you may be wondering how to setup your workspace.
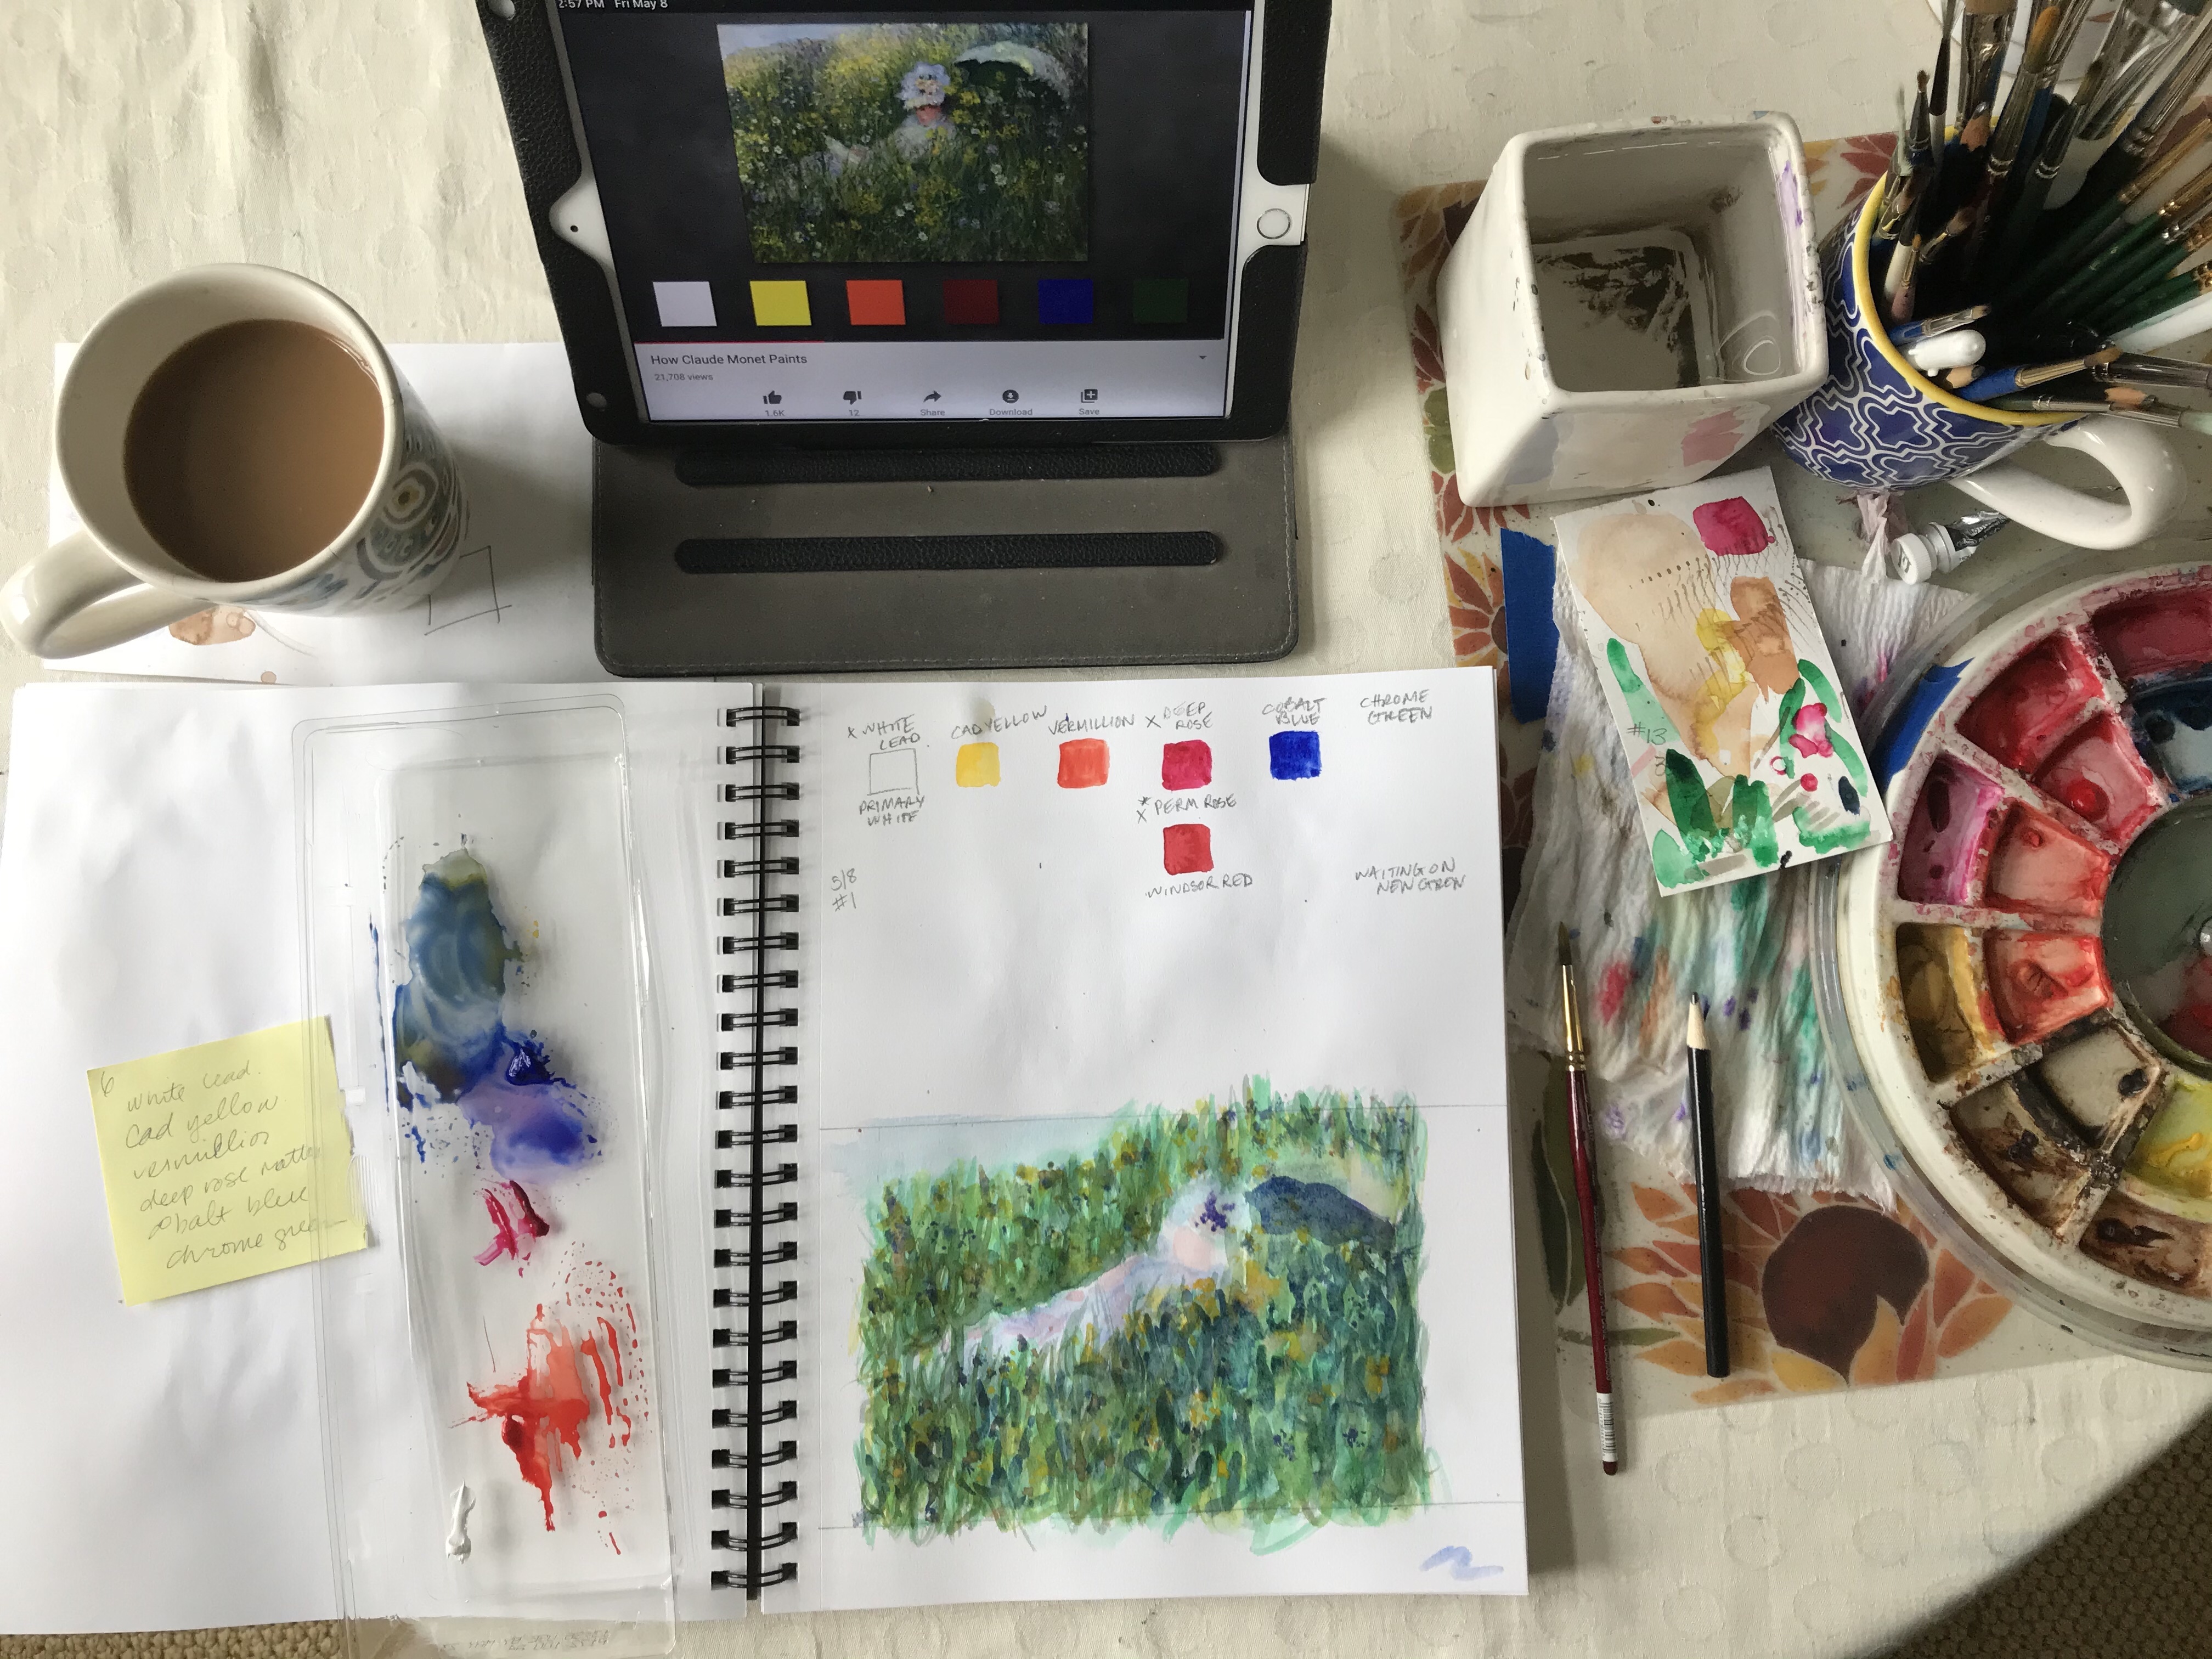
As a right handed person, I set up most of my supplies to the right of my paper or sketchbook. This is so I’m not reaching across my paper to get water or paint – I don’t want to accidentally drip on my paper! I usually place a reference photo (on my ipad) directly in front of my workspace. My mixing palette (top of an egg carton) can be moved around as needed. It’s always best if my coffee isn’t near my water. I’ve dipped my paintbrush in my coffee too many times!
how do you paint with watercolor?
A key element to painting in watercolor is water.
If you use a dry brush, the paint will go on rough and paper will show through in spots.
If your brush is wet the paint will glide onto the page.
If the paper is wet the paint will bleed into the water on the page when you touch it with your brush.
To lighten watercolor add water, NOT white.
These different ways of painting work in different circumstances. To paint one subject you will likely use all of the above ways of painting in different areas.
what should i paint?
When you are starting out it’s sometimes hard to come up with ideas. You’d like to practice but don’t know what to paint. Choosing a challenging subject can be discouraging.
printable painting tutorials
To help with this and to introduce you to the fundamentals of watercolor, I’ve created printable painting tutorials. Each tutorial walks you through fundamentals as you paint the steps for a specific final painting, like the “WATERCOLOR CONEFLOWER PAINTING LESSON” below.
When paper gets wet it wrinkles and buckles. To avoid this tape your paper to a piece of cardboard using painter’s tape. The tape also creates a nice border to your painting.
For weekly tips, sign up for my newsetter:
Processing…
Success! You're on the list.
Whoops! There was an error and we couldn't process your subscription. Please reload the page and try again.
looking for a comprehensive introduction to watercolor? This guide is for you!
This Beginner Watercolor Exploration Guide is the perfect introduction to watercolor. Each fundamental is explained and then you practice it with exercises and painting projects.
The 5 tutorials build upon one another as you progress through the guide. You go from beginner brushstrokes to a watercolor seascape!
This posts contains affiliate links to products/brands I use and recommend. I earn a small commission whenever you buy using these links, at no additional cost to you. Thank you for supporting my blog!
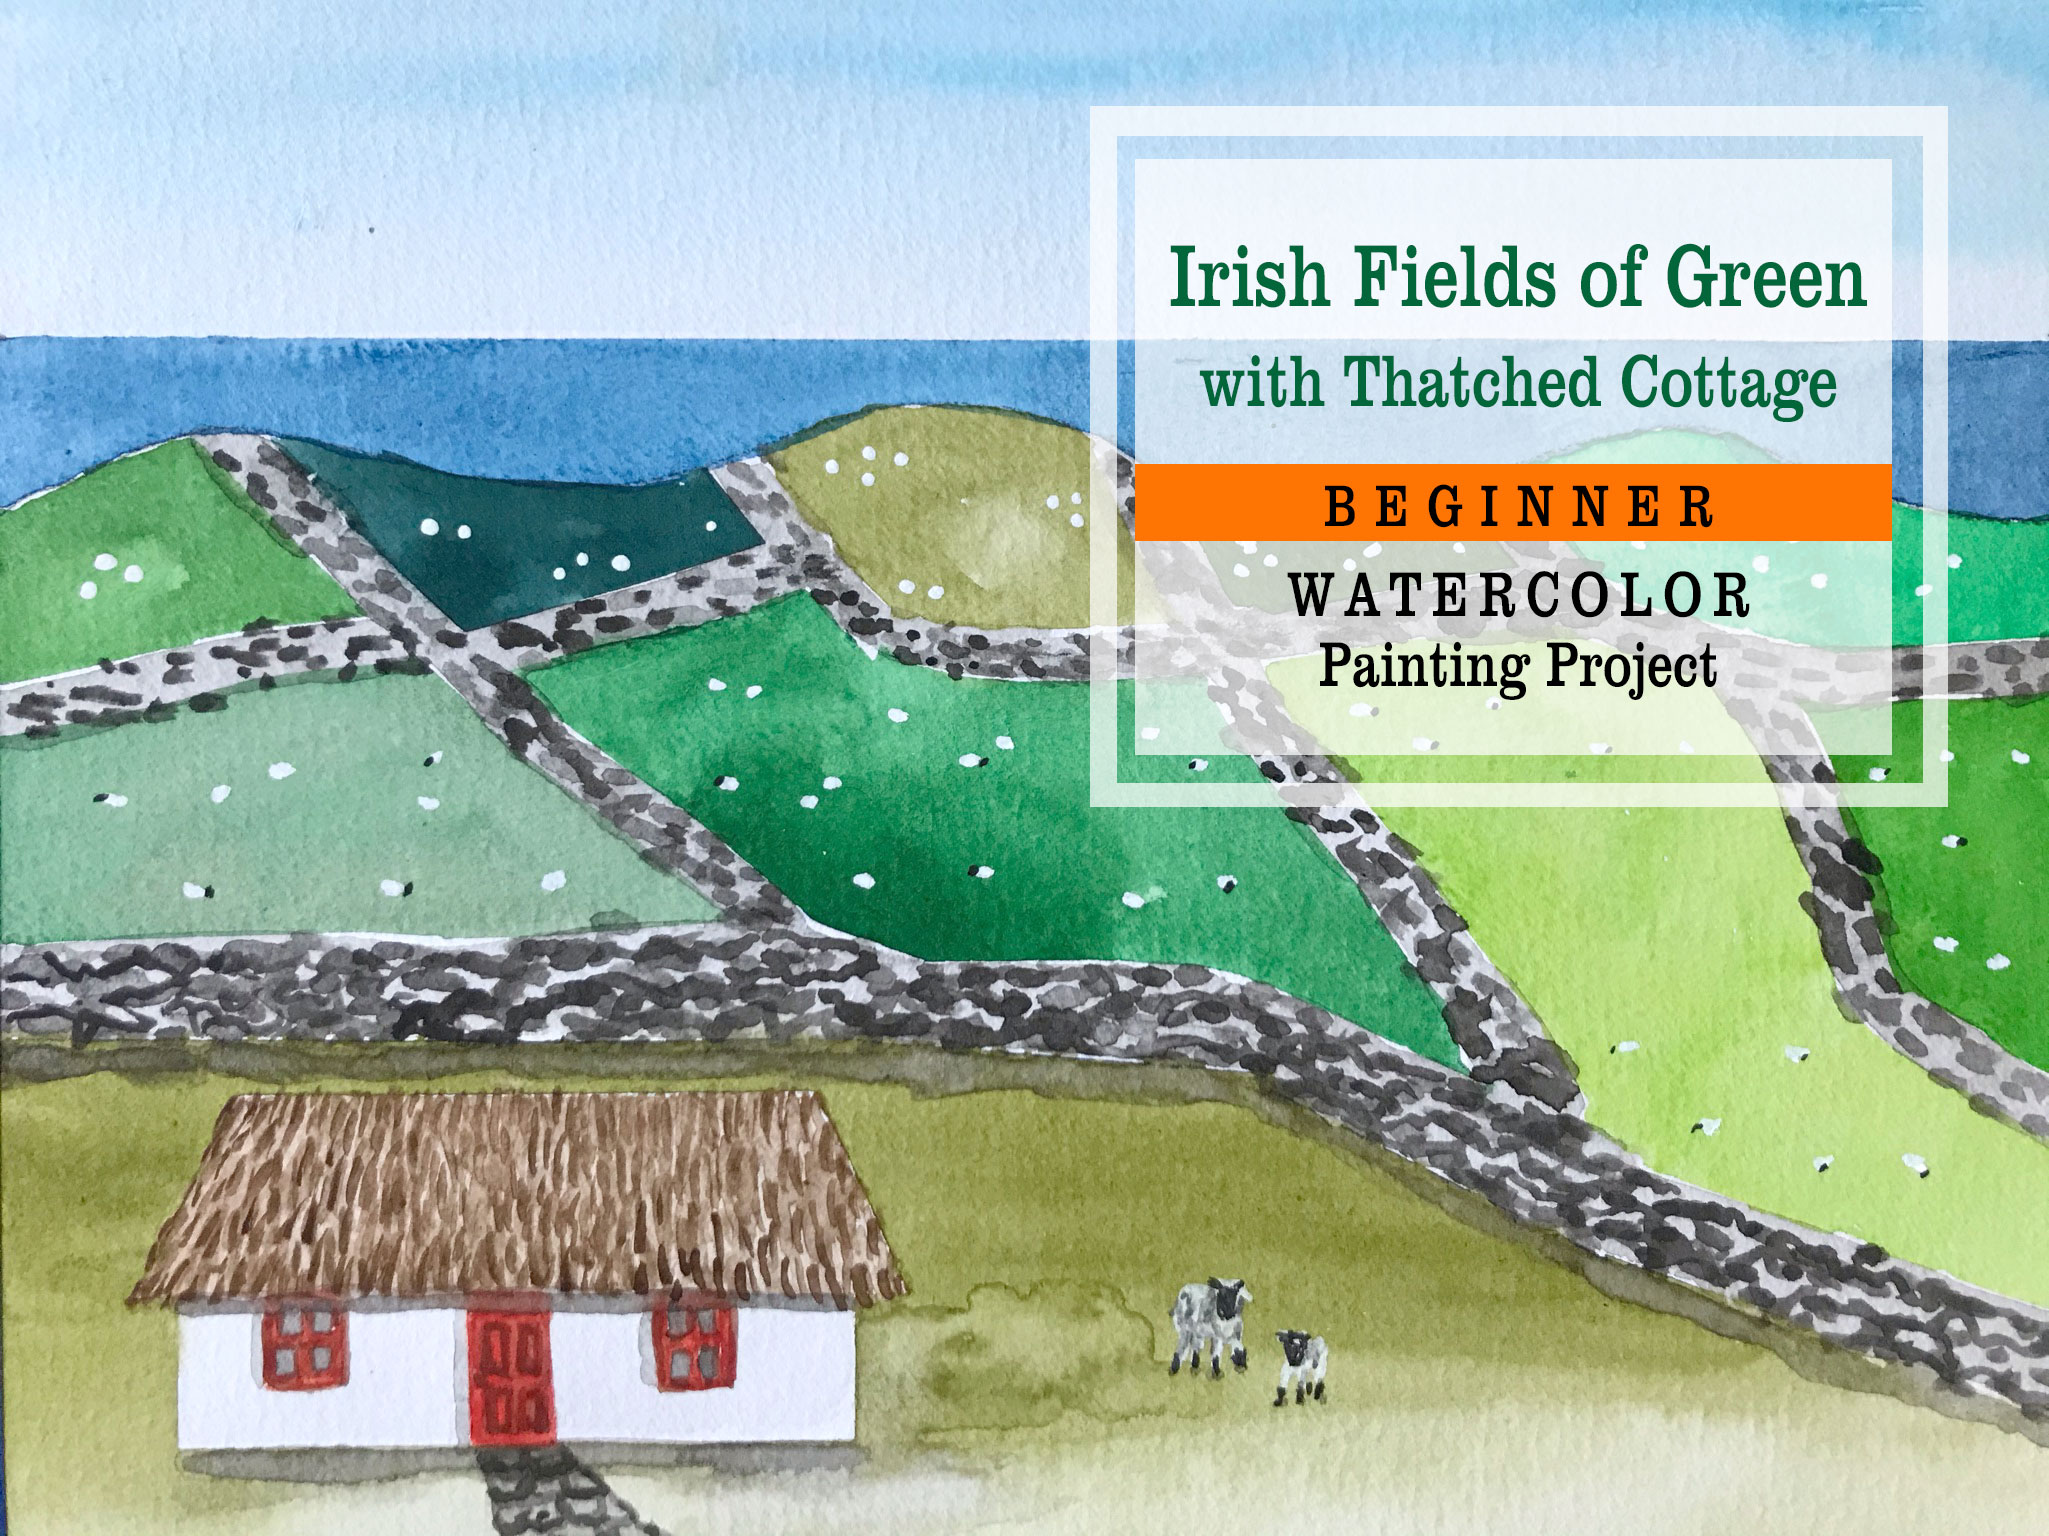
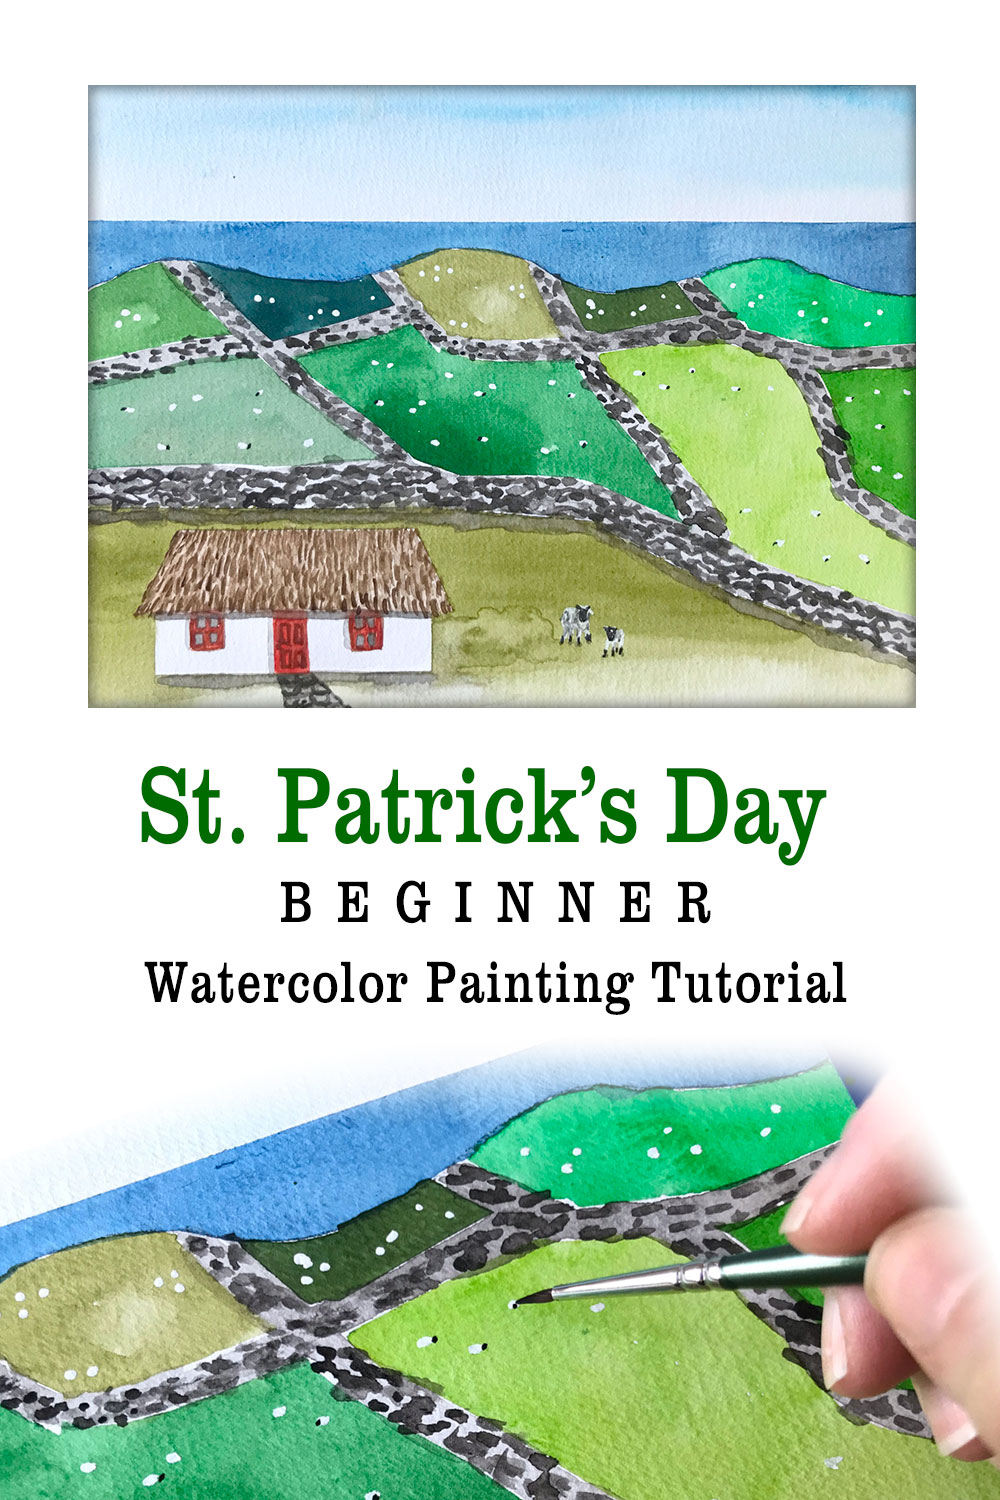
This Fields of Green Watercolor Painting Project will get you in the spirit of St. Patrick’s Day and take you on a “visit” to Ireland!
Beginner Watercolor Painting Idea for St. Patrick’s Day
Ireland is said to have “40 Shades of Green” and in this beginner watercolor project we’ll use as many shades as possible! Beginner friendly! Step by step tutorial with photos walks you through painting this Irish landscape.
In addition to learning all these techniques – you’ll have a beautiful final painting when you are done!
Supplies you’ll need:
Watercolor paper. I use 9” x 12” Arches 140 lb. cold pressed paper. Trim to 9” x 11” to create a painting that works well in a 8” x 10” mat.
Painter’s tape – 1” wide
Watercolor paint. Colors: shades of green and/or blue and yellow for mixing greens (a touch of red can be added too), blues for sky (turquoise or other blue) and ocean (prussian or ultramarine blue), black, and orange (can mix with yellow and red) AND…
Gouache – White Gouache (Gouache can go over watercolor. It is less translucent.)
Paint brushes – 1 large round brush – #6, one thin round brush – #1
Container of water
Paper Towel
Palette for mixing paint with water and mixing colors. Use a plastic lid or the top of a plastic egg carton.
Pencil, eraser (kneaded is best), ruler and scissors
Scrap of paper. Always test color mixes before touching your painting with your brush.
I have been painting in watercolor for over twelve years. When I first started out I didn’t know anything about paper or paint or even brushes. For months I used the wrong paper and it showed! Over the years I’ve tried different paints, papers and brushes. I created the “Watercolor Basics” pdf to give you the information I was missing when I started. I want you to start your watercolor journey with the right tools and tips, so that you’ll have success and develop a love of watercolor like I did!
To receive the free pdf, just sign up for my weekly newsletter – a collection of all the things inspiring me, in hopes of inspiring you!
In my previous Watercolor Basics posts I covered paper, brushes and paint but there are a few other items that are also important to have on hand.
Water – With watercolor paint, you need water to dilute your paint and to clean your brushes. I like to have two containers of water on hand so I have a backup when the first container gets dirty. Jars, cups, mugs, all work well. I prefer the container be white or clear so I know what color the water is.
Paper towel – the simplest ingredient but so important. I constantly dab my brushes on my paper towel to absorb excess water.
Scrap of paper for testing what’s on your brush before you touch your paper.
Tape, cardboard, ruler and pencil – Before I start painting I always tape my paper (with painter’s tape) to a larger piece of cardboard (the back of an old pad). This prevents the paper from buckling when it gets wet. Another thing I often do is tape the horizon line. I measure and mark both sides of the paper and then apply tape from one side to the other.
Egg cartons – I have paints in my palette. I have a mixing tray that contains commonly mixed colors and then I have tons of egg cartons! I use the top of the plastic egg carton as another mixing tray.
Mug – to hold all my brushes, pencils, etc.
Ipad – for viewing reference photos.
Phoneand earbuds – for taking photos and listening to my favorite podcasts while I paint.
This post contains affiliate links to products/brands I use and recommend. I earn a small commission whenever you buy using these links, at no additional cost to you. Thank you for supporting my blog!
There are several types of watercolor color paint including – pans (or cakes), tubes, and liquid. Many paints are available in student and artists grades. Student grades are a more affordable option, but usually have less pigment.
Pans (or cakes) – When I was starting out I associated watercolor pan sets with the paints I used as a child. I have since learned that the pans available today contain rich, saturated colors and are widely used by many watercolor artists. Just like my Sakura Koi travel palette!
Tubes – I started with tubes and have stuck with them. I was originally gifted a set of Van Gogh tubes. The set includes a variety of colors. It’s a great set to start out with. As I used up my Van Gogh tubes, I began replacing them with Winsor & Newton tubes. I also began adding other colors (like pink and purple) with Winsor & Newton tubes, sometimes with their student grade brand Cotman.
My Palette – I squeezed small amounts of most of my colors into my palette. I reactivate dried paint by mixing it with water. Sometimes I work directly from the tube and use a mixing tray or the top of a plastic egg carton to add water or mix colors. You don’t actually need tons of colors – I often create paintings from primarily just three colors – Ultramarine, Cadmium Red and Cadmium Yellow.
Liquid – Watercolor paint also comes in liquid form. Some liquid watercolors – like the ones below – have an eye dropper top. This seems like a great way to guarantee that you mix the same colors every time – just keep track of how many drops you use. My friend uses liquid watercolors and her colors are rich and vibrant.
Which type of paint you use is a personal preference. I don’t think there is a wrong answer. Pick one to try and see how you like it!
Tip – always keep a scrap piece of paper nearby to test the saturation of a color and/or your color mix before touching your painting!
This post contains affiliate links to products/brands I use and recommend. I earn a small commission whenever you buy using these links, at no additional cost to you. Thank you for supporting my blog!
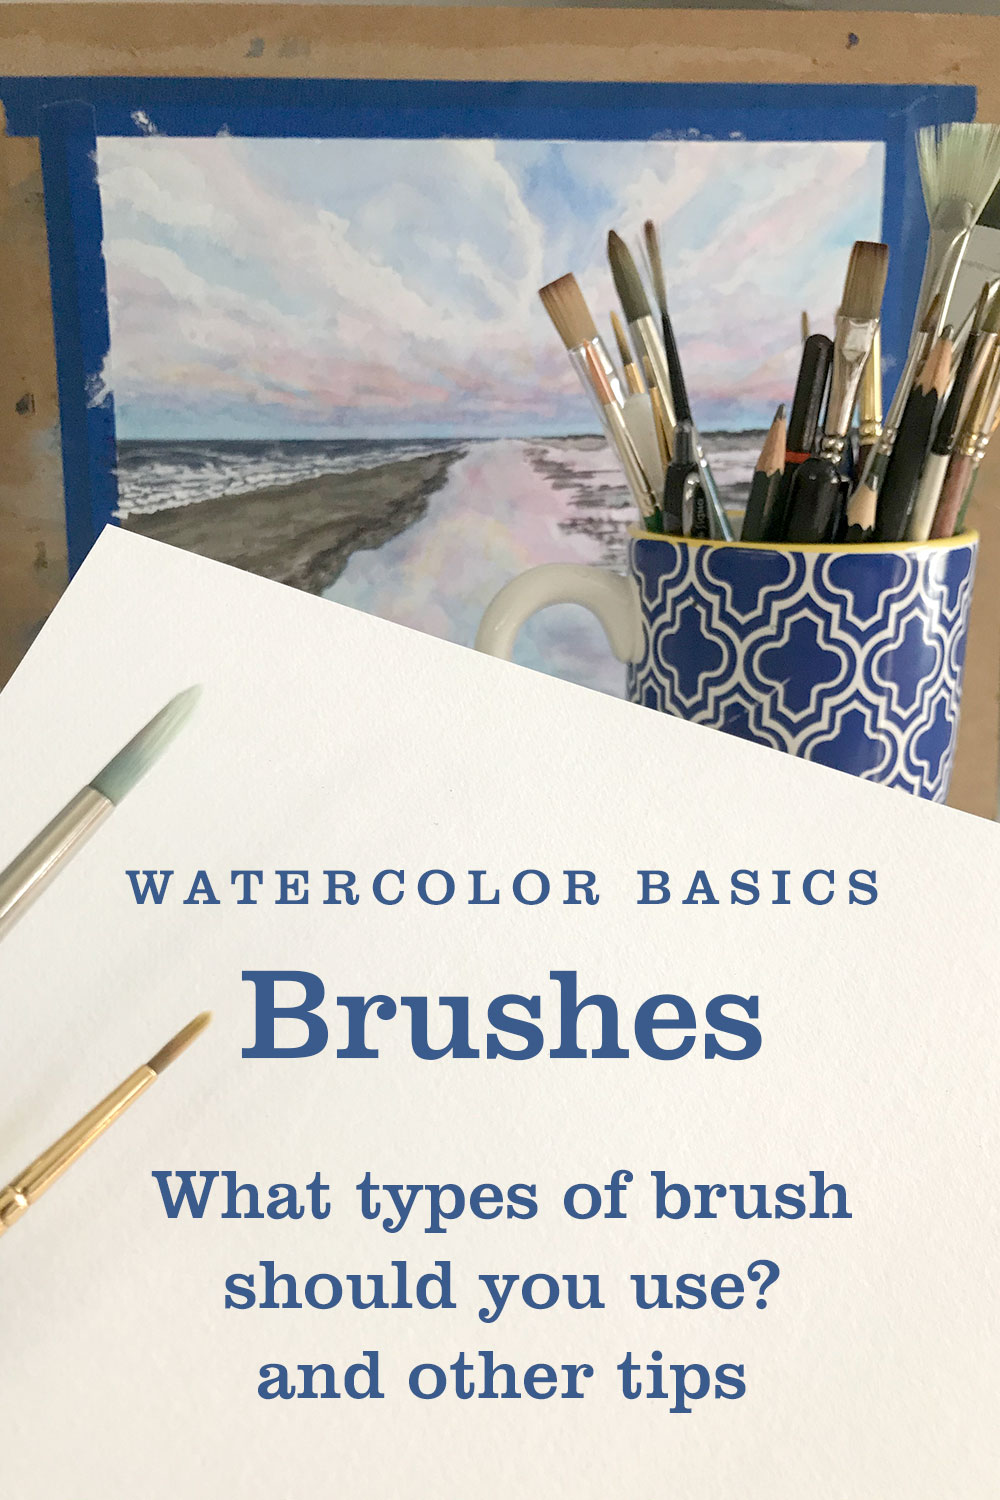
If you have ever stood in an art store paintbrush aisle, you know how overwhelming selecting brushes can be. There are brushes for every medium, synthetic and natural brushes, and brushes in a variety of shapes and sizes. I have a variety of brushes but in truth I only use a few.
Here are some tips for selecting brushes:
Round brushes are the most commonly used brushes for painting in watercolor
Thick and thin. If you could only buy two brushes I would recommend a medium sized round brush for larger areas (like a 6 or an 8) and a thinner round brush (like a 1 or 2)
Natural vs. synthetic. Synthetic brushes tend to be more affordable and are a good option (especially when you are just starting out.)
Over time I’ve learned:
Flat brushes are great for horizontal lines. I use flat brushes for certain details when painting seascapes.
Very thin brushes (less than 1s) are great for fine lines and detail.
I rarely use bigger brushes (10+). I may use them to wet a background or to paint a gradient in the sky but I primarily use size 8 and smaller. It’s a personal preference that may have to do with the size of the paintings I most commonly create (8”x10”). My choices may also have to do with style I paint in. Some artists paint in a looser style perhaps using larger brushes, and some in a much tighter more realistic style, perhaps using thinner brushes.
There are also specialty brushes for creating certain types of lines like a fan brush. More often than not, I stick with the brush in my hand instead of switching brushes.
Caring for your brushes:
Wash your brushes and lay them flat to dry on a paper towel.
Don’t leave your brushes sitting in water. It will cause the paint on the brush to chip off.
Use an old brush to reactivate dried out paint. I’ve squeezed my paint into a palette. When I want to use a color, I mix it with water. To protect my newer brushes I use an old brush to stir the water into the dried out paint.
The more you paint, the more your own personal preferences and brush needs will emerge. Start with a few round brushes and add from there.
This post contains affiliate links to products/brands I use and recommend. I earn a small commission whenever you buy using these links, at no additional cost to you. Thank you for supporting my blog!