
When I saw a paper quilt on the Country Living magazine website (from Linda & Harriett – see links below), I knew I had to make one. I have always wanted to make a quilt, but I can’t sew! I wanted to go to the craft store and get paper, but it was pouring out, so I decided to use what I had, including pieces of a gift bag.
The Country Living quilt calls for 2″ squares of paper in 4 different styles (20 squares of 3 styles, 21 squares of 1 style). I have a 1″ square punch, so I decided to use that and make my quilt with 1″ squares. I drew out a grid of 9 rows and 9 columns, so I could plan my design and play with different paper options. Since I was unsure of which papers to use, I decided to follow the Country Living design. I wanted to use mostly greens, because St. Patrick’s Day is around the corner.
I selected 4 paper styles and punched out my squares. I also punched out shamrocks. I placed the squares on the grid, following the Country Living design. I took a photo and swapped out one of the papers. I tried a couple of options, taking photos of each one, so I could compare. I decided to go with the last option I tried.
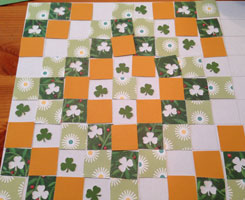
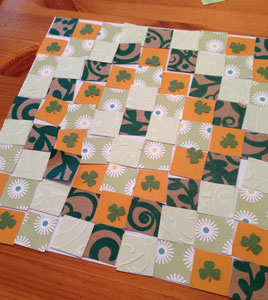


Since the grid I drew wasn’t perfect, I got a new piece of paper to glue the squares on. Using a glue stick, I started in the corner, using the edges of the paper as a guide to keep everything as even as possible. After it was done, I trimmed off the unused paper. I mounted my quilt on a piece of card stock.

I couldn’t be happier with the results! It is going on my mantle! What a fun project.

Visit my Etsy shop for downloadable clipart:

and invitation borders:

Order some St. Patrick’s Day flair in my Zazzle shop!

Create an Irish Blessing sign with this downloadable pdf and transfer tips.

Links:
Country Living
Linda & Harriett


Warming up for St. Patrick’s Day–I love it! And I love your quilt. What a fun project.