

Nothing completes a day at the beach like a treat from the ice cream truck! I created this fabric print using illustrations from my sketchbook. Want to create a pattern from your illustrations? Follow the instructions below.
How to create a repeating pattern in Photoshop
- Scan your artwork (or draw your elements in Photoshop)
- Create a new file in Photoshop that is the size of your intended repeat size.
- Create a layer that is a solid color (will not be visible in the design – just for positioning. Mine is white.)
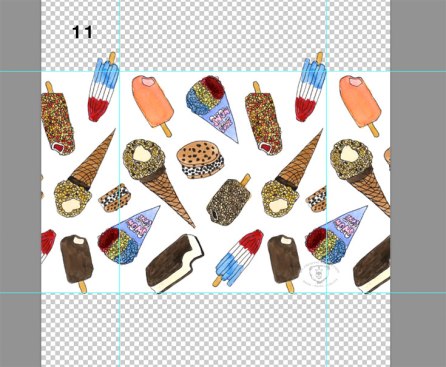
- Double the size of the file (for example repeat is 3 x 4, make file size 6 x 8)
- Use guides to Mark the repeat area (solid area)
- Import the scanned artwork into your file
- Separate the elements of your artwork into different layers
- Size the elements and arrange them mostly within this rectangle (the guides) – elements can go over the guidelines.
- Create a background color that is the entire file size – keep it out of all the groups we will be making (it needs to be positioned below all the other layers)
- When you are happy with the arrangement create a group with all the layers – except the background color
- Copy the group 2x, place one group to the left of the guide and one to the right using the color layer as a guide for positioning
- Create a group of the three groups – the original, the right and the left, make a copy
- Place the copy above the original group (above the guide)
- Create another copy and place it below.
- Turn off the color layer in each group that was for placement only
- Do you like the arrangement of all the elements now that the elements are repeating? (If elements go over the guidelines in your design, this is where you will see if things accidentally overlap, or are too close to one another.) If yes go to step 18. If no go to step 17.
- If not, delete all the groups except the original, adjust the position of the elements, and repeat the steps of copying the group and placing left and right and then making a group from the 3 groups and copying to place above and below.
- To save the final repeat, first go IMAGE, CANVAS SIZE and enter the original repeat size.
- Test your repeat – open the repeat, change background to layer, increase canvas size by double. Copy repeat layer and place to the right, left, above, below. Do the elements line up properly? If so yes…
- Upload the final repeat file, and order a test fabric swatch. I use Spoonflower.com.

Want to see another example of designing a repeat? Read this blog post.
Another helpful post: Designing Patterns – important things to remember.
Want to order the Ice Cream Truck pattern as fabric, wallpaper, gift wrap? Visit my Spoonflower shop here.
Sign up for my new newsletter!

My newsletter is a collection of all the things that inspire me… “my creative collection.” It contains – artists and makers, places, crafts and art mediums, tutorials, podcasts, interesting articles, and more. All the things that inspire me, and will hopefully inspire you! Sign up here.


Wow! Thanks for sharing this info, Eileen! I have always wondered how people did this! 😊👍
You are welcome Jill. Let me know if you give it a try. 😀
I am in no way tech savvy, but I recently painted a simple pattern for the Halloween time holiday. Would love to have some fabric made from it. Wondering if there is a place I can send it to have it made. Your help would be greatly appreciated.
Hi Bev. I use spoonflower. https://www.spoonflower.com/ It is so satisfying seeing your own designs as fabric. Good luck! Let me know how it goes.
Thank you, this is really valuable information
I’m so glad you find it useful!