Designing Patterns – important things to remember.

monkeysketch
If I knew what I was getting into, maybe I wouldn’t have been so enthusiastic about pursuing pattern design. Ha ha. I say this because I am realizing all the aspects that go into designing for fabric, gift wrap, and beyond. My head was spinning a bit this weekend, as all I took it all in.

Things I need to remember:

  1. Select colors from a color guide, don’t rely on the computer screen. As a graphic designer, I should know this, but I get caught up in the screen colors and forget. Then my swatch arrives and I’m surprised by the colors! And I have a fabric swatch of Spoonflower’s color guide! Now, I’m keeping it next to my computer.
  2. What is the repeat? I get caught up in the illustrations, and forget that the way they work together is almost more important than what they are. I’m reading an interesting book called Patternalia, An Unconventional History of Polka Dots, Stripes, Plaid, Camouflage, & Other Graphic Patterns. It’s a quirky book. I’ve already started to look at patterns differently. In the book, they mention pattern effects like “figure-ground reversal – This is where the figure and background are equally sized and therefore easily confused with each other.”
  3. Observe other patterns. I find observing helpful when I’m trying to learn something new. Looking through patterns, determining if I think they are “successful,” and why, is really helping me. Again, it is all about how the elements work together and repeat.
  4. Is simpler better? I definitely overcomplicate things. I need to remember that simple is often better. Some of the successful Spoonflower patterns I looked through, had the simplest elements.

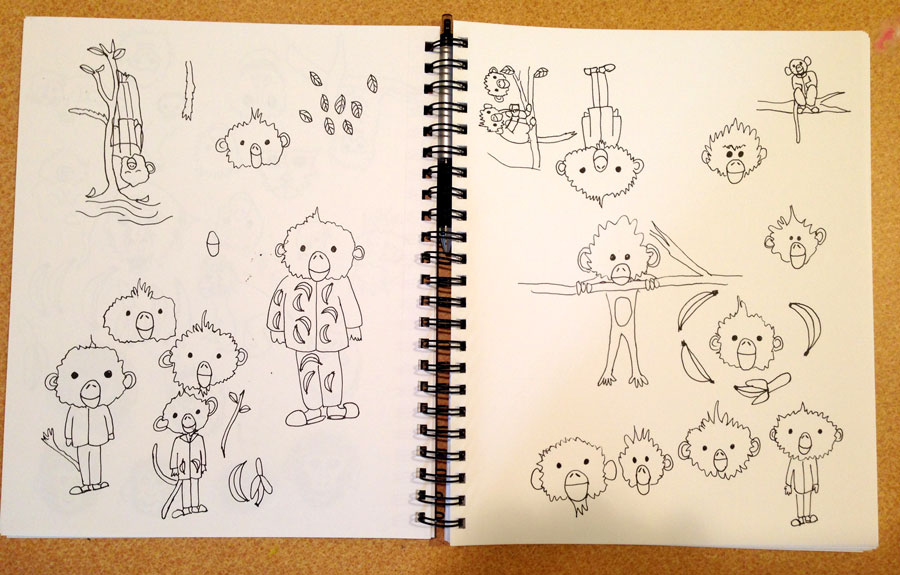
I decided to give the latest Spoonflower contest a try: The Year of the Monkey. I started by doodling in my sketchbook. At first, my monkeys were downright scary – too realistic, too scary. After I simplified them, they got cuter. When I had a few I liked, I started to sketch out how they could work together. I was getting very detailed and complicated, with many elements. When I sat at the computer, and scanned in my favorite illustrations, I made the decision to simplify. The deadline is today after all! 😉

Planning the pattern:
monkeysketch2

Learning the keys to successful surface design

valentine2015repeatsm
At the end of last year, I had just started ordering my pattern designs in wrapping paper and fabric. It’s totally different, to not only see the pattern printed, but then work with the gift wrap and fabric. As I wrapped presents in my designs and other designs, I became aware of things that I never noticed before. Most importantly that a lot of the designs have some elements that are upside down and some right side up. This way, there is no correct side.

Over the summer, when I ordered fabric in my sandcastles design, I experimented with making it into a pillow. I realized how important the size of the repeat is. If it is too big, and you try to make a small pillow (or wrap a small present), then most of the design gets cut off.

These are things you don’t notice when you are creating on the computer. As I continue to pursue surface design this year, my goal is to not only design patterns, but have them printed as gift wrap or fabric, and (most importantly) create something with them – to be the end user. I think it’s the best way for me to learn how to make successful designs.

Earlier this week I tweaked last year’s Valentine’s Day design and ordered a swatch (see above). Specifically, I changed how the pattern repeated. I’m am excitedly waiting it’s arrival! I am also working on a second Valentine’s Day themed pattern, that has more of a watercolor feel.

Original Repeat:
valentine'sdaypattern

To see the 12 patterns I designed in 2016, click here.

My 12 Surface Designs – one a month this year!

I’m really proud, and happy, that I followed through on my goal to start creating surface designs. I designed the first one in January, and decided to commit to “1 Surface Design a Month.” That goal, and the end of the month deadline, really pushed me to put in the work.

12 Surface Designs
January – Art Supplies

artpatternrepeat

February – Valentine’s Day
valentine'sdaypattern
March – Gardening
gardeningrepeatfinal2
April – Dahlias
dahliapatternv2
May – Sandcastles
sandcastleEM
June – Echinacea
echinaceapattern

July – Shells
shellspattern

August – Ice Cream Cones
watercoloricecreamcones

September- Feathers
featherspattern1

October – Leaves
leavespatterncolor

November – Nutcrackers
nutcrackersrepeating
December – Toy Soldiers
toysoldiers2_5inchhigh

I’m always asking you, “What’s your favorite?” And I would love to hear, but I’ll also tell you my favorites.

I really liked when I started using the technique of creating the ink lines and watercolor backgrounds separately and then merging them in Photoshop. I started this with the shell pattern. I think the watercolor really adds a depth that you can’t get with Photoshop brushes. I started this technique with the shells, and continued it with the leaves – which is my favorite design in this style.

My other technique is drawing the elements in my sketchbook and adding color in Photoshop. My favorite design, using this technique, is the Toy Soldiers. They are just so cute!

Will I be continuing with surface design in 2016? Absolutely! As you know, I’ve made the Nutcracker and Toy Soldier patterns available on Spoonflower, where you can have them printed as fabric or gift wrap. It is really interesting to see the designs printed and to think about how it will be used. It makes you think about the design, and what works and doesn’t. It’s a different perspective than just seeing it flat on the computer screen.

In the new year, I’ll be adding a few of the other “12 designs” onto Spoonflower. And I plan to continue designing one new one a month!

Toy Soldier Pattern

toysoldiers2_5inchhighrepeat
When I was a kid I watched the March of the Wooden Soldiers every year. Maybe that’s what inspired the design of my second holiday pattern. (The first was nutcrackers.)

toysoldiers2_5inchhigh
I’ve ordered the Toy Soldier pattern as gift wrap from Spoonflower and I can’t wait for it to arrive! This year I want to be especially crafty and creative with my wrapping. And I plan on sharing my creations on Instagram – I hope you’ll follow along! 🙂

Nutcracker Pattern – and it’s available as fabric and gift wrap on Spoonflower!

nutcrackersrepeating
I’m so excited to announce that this Nutcracker pattern is available on Spoonflower and can be ordered as fabric or gift wrap! I just received some Nutcracker fabric and I’m excited to make something with it for the holidays!


You all know how passionate I’ve been about surface design this year! I’ve been wanting to take the next step, and see these patterns in action. And make them available to anyone else who is interested in them. I plan on adding some of the past year’s pattern designs to my Spoonflower shop too. If there is a particular one you are interested in, please let me know (links below).

This Nutcracker pattern is my “November” design. I know it’s jumping ahead of Thanksgiving, but I couldn’t help myself! I’ve already uploaded another holiday design and am waiting to see it printed. I’ll share with you, once I have it in my hands!

My surface designs this year:
January – August
September (includes a tutorial on making a repeating pattern)
October

Self imposed deadlines {and a leaf pattern}

leavespatterncolor
I remember, way back in elementary school, staring a project early, but never finishing it until the night before it was due. I needed the deadline to motivate me to finish.

All these years later I know the power deadlines have to motivate me. Now, I’m using this to my advantage. If I want to accomplish something I set a deadline. In my work, these soft deadlines are supported by the client waiting for the final product. In my creative life, these “made up” deadlines are supported by you. If I write on the blog, I’m going to do something, I intend to follow through on that promise. Whether anyone remembers or not!

This leaf pattern design is my October surface design. Yes, I’m a couple of days late, but I got caught up in my Halloween creations!

I’ve designed one a month this year! That’s 10 so far! I’m really proud that I set “surface design” as a goal for 2015 and have achieved it. I designed the first one in January. That’s when I committed to “a design a month.’ Setting the monthly deadline has made all the difference in pushing myself and getting it done.

Have you set deadlines for yourself? How did that work out? If you haven’t, are you considering it now? I’d love to hear!

If you’d like to learn how to turn your artwork into a repeating pattern, read this recent post.

How to create a repeating pattern in Photoshop {Feathers my pattern for September.}

featherspattern1d
Here is my pattern design for September. As you may have seen, I’ve been drawing and painting feathers all month, so it’s seemed appropriate to turn them into a pattern. I pieced this pattern together from my sketchbook (see below). I wanted this pattern to be much tighter than ones I’ve designed so far this year. This tighter pattern, required more playing and arranging in Photoshop becauses once I thought the pattern was “set” and I tried repeating it, things would overlap and I’d have to readjust and try repeating it again.
feathersinink

If you know Photoshop and want to try creating a pattern, I’ve included my steps below.

Creating a pattern in Photoshop:

  1. Scan artwork
  2. In Photoshop: separate each element of your design into different layers
  3. Within your artboard, create the area for your “repeat” using guides. (translation: use guides to create a box within your artboard. You can expand the canvas size before this step.)
  4. Arrange your elements. They can go over the guides.
  5. On a separate layer outline the guides to make a box.
  6. Create a group with the box and element layers – call it “original”
  7. Duplicate the “original” group. Drag to the right so the left edge of the box touches the right guide
  8. Duplicate the group again. Drag to the left so the right edge of the box touches the left guide
  9. Select the three groups and duplicate them. Drag the 3 duplicate layers up, so the bottom of the boxes touch the top guide
  10. Duplicate the three groups again. Drag them down, so the top of the boxes touch the bottom guide
  11. If any adjustments need to be made – delete all but your “original” group, make the adjustments and repeat steps 7-10
  12. When you are happy with your repeating pattern, hide all the layers with the box outline.
  13. Crop to the guides to create your “repeat.”


Below, you can see my boxes. The center box is where I have my guides (which are not visible).
featherspatternboxes

Slight variations on my feather pattern.
No distress in the background. 
featherspattern1

Distress shows yellow.
featherspatterndy

Which one do you like best? 🙂

Copyright 2015 Eileen McKenna. All rights reserved.

Pattern of Ice Cream Cones … Mmmm

watercoloricecreamcones
It’s very fitting that my pattern for August is ice cream cones. I’ve gotten into the habit of having ice cream almost every night this Summer!

I created this pattern using the same process as last month’s pattern, Shells. I doodled the ice cream cones in my sketchbook, painted the backgrounds separately and then mashed them together and arranged them in Photoshop.

If you’ve missed them, I’ve been illustrating a pattern a month this year:

July – Shells
June – Echinacea
May – Sandcastles
April – Dahlias
March – Gardening
February – Valentine’s Day
January – Art Supplies

It helps to have the deadline of the end of the month. I wouldn’t be as motivated without it.

I entered the Sandcastle pattern into a Spoonflower contest a few months ago. I’d love to try another contest and upload more of my patterns onto Spoonflower. A goal to work towards before the end of the year. 🙂

A pattern for July – Seashells

shellspattern
I really enjoyed creating this pattern. It brought me back to collecting shells as a kid and marveling at the patterns and colors. Oh wait, I still do that!

This pattern started with doodles in my sketchbook. I drew a lot of shells! I have jarfuls on hand for reference.
shells-2

Then on watercolor paper I painted shells using different colors. I took creative liberties with this step.
shellswatercolor-1

I scanned everything in, and layered the outlines and watercolors together in Photoshop. I also added a textured background. After I had my arrangement set, I repeated it to see how it worked. I had to shift things a bit when the shells overlapped.

I truly felt inspired creating this pattern. It felt very nostalgic for me. And I can’t wait to get back down to the beach to collect more shells.