Comparing last Fall’s work to this Fall

suntree
As I added branches to my latest illustration project, I wondered, “What was I working on last year?” I asked myself the same question at the end of the Summer and the answer was interesting. When I looked back to Summer 2014, I saw the start of my watercolor and ink style. I could pinpoint that first project where I added the ink details, and something clicked. The first couple of projects from Summer 2014 looked one way, and then a change took place.

Now, when I look back to last Fall, I see that I continued to work in that style. I actually don’t see much of a difference between last Fall and this Fall. To me, the projects are almost interchangeable.

Fall 2014
sunflowerouttakes falltree2 newfalltreefallleavesfinal

Fall 2015
boywithleaves1 watercolorinkleaves finalchangefinalrainbowfeather

But I don’t feel stagnant. I still think I’m growing and developing, and I’m happy to have found my style. Especially, after years of wondering how to find your style!

What I’ve learned in the 2nd half of 2014 (about myself and art)

joy
At the 6 month mark of My Creative Resolution I wrote a post entitled “What I’ve learned about art (and myself).” As I sat down to write this, I reread that post, and I realized a lot of those items are still the important things I’ve learned this year. But I do have a few items to add. Those “6 month” items were mostly about art. The items I am writing now, are what I’ve learned about myself.

  • I love working square
  • I love adding ink. This is so surprising to me! I used to think adding all those lines seems so tedious, but I’ve found – you get into a zone.
  • Watercolor portraits – soften the edges so the skin doesn’t look blotchy.
  • I love being creative. I love having a project in the works, or ideas for new projects, or both!
  • I’m affected by the seasons. I can’t help being inspired by what is around me, whether it’s Spring flowers, Fall leaves, Winter’s evergreen trees, or a day at the beach.
  • I like being spontaneous and working on what inspires me in the moment. I found my weekly checklist to be too much after a while.
  • In the past I was frustrated with wanting to develop a style. Now, I’m embracing the journey. I’m in no rush, and I’m having fun doing it.
  • I’m no closer to selling and I’m not sure selling is for me. I don’t want to be filling orders or creating sellable things. I want to create what I’m inspired to create.
  • I love blogging – see more below.

What I love about blogging:

  • It motivates me to create.
  • I love working on new projects. Each new idea sparks more and more ideas.
  • I enjoy writing.
  • I like thinking about my process – what worked, what didn’t, what was a happy accident, or a mistake to learn from.
  • I love the community and feedback.
  • I’m inspired by and learn from other bloggers and I am honored when someone says I do that for them.

I am bursting at the seams with ideas for making My Creative Resolution better, for me and you, in 2015. I hope you’ll join me as my creative journey continues. 🙂

My Creative Resolution – a year in review.

chart
As the first anniversary of My Creative Resolution approaches, I decided to look back and see what I worked on this year – what mediums I choose. It was surprising to me that during the first two months I painted with acrylics. I think it was something I’ve wanted to do for a long time. I even pulled out old unfinished canvases and finished them!

After two months, I was getting a little bored with my sketchbook and I pulled out my watercolors. Well, that changed everything! I started focusing more and more on watercolor. I had a history and some knowledge with watercolor. I added to that by watching videos and absorbing ideas and techniques from other artists online. I was having fun with it and was more and more liking my results. For too long I was working on crappy paper, but eventually I bought the right stuff!

Eight months in and I decided to paint cards for the swim coaches. To make the cards whimsical I added ink to the cards. When I draw in pencil, I tend to have a scratchy (lots of lines) style. In the past whenever I tried pen and ink I thought I had to draw one perfect deliberate line. (This stressed me out.) This time I scratched away (with the ink pen) and was happy with the results!

After that, I started adding ink to a lot of my watercolors. My favorite, surprising result, was when I took two outtakes and attacked them with a pen. I liked them better than the original painting!

For a long time I wanted to know what my style was – especially when I was trying to illustrate a children’s book. I scoured the internet for the answer – how do you develop/choose a style? Now I know that the answer is simple – time. Take the time to practice and try different things and your style will come out. The longer you work at it, the more it will evolve.

Even though I’ve almost reached the one year mark in My Creative Resolution, I have no intention of stopping! I am so happy with the results – the result of pushing myself to keep at it. I can’t wait to see where this journey will continue to take me, where I’ll be in six months or in another year. My original creative resolution was to draw, paint and create. I left open the possibility that I might be sanding and refinishing furniture, making signs, drawing or painting. BTW there are STILL a few pieces waiting in the garage to be refinished! Maybe in 2015?

Back to the drawing board with Beach Girl’s Face

backtodrawingboard
Last week I struggled with the face of my “beach girl” in a fun watercolor painting where she was floating in a pool. I “erased” her face several times and destroyed the paper. It was extremely frustrating.

Looking back I realized that just diving in to paint her face was a bit of a mistake. I haven’t quite figured out how to paint her face. A while back I arrived at a cute pencil drawing of her face, but how does that apply to watercolor? I’ve decided I don’t want her to have just a couple of lines and dots – for eyes. I want to add a little more detail. But I’m not sure how.

It was naive of me to think I could just wing it. If I had started with her face, in the floating painting, I would have thrown away several versions. Instead I painted everything around her face and thought I’d figure it out. (That is the Aries in me!) I now realize figuring it out is going to take time, work, patience and lots of practice.

I’ve been working on this all week. First I did pencil sketches using photos of my daughter (the inspiration behind beach girl). It is amazing how hard it is to capture the essence of a person. Is it the shape of her eyes? her chin? Then I spent time mixing colors, to figure out the right skin tone. I mixed Permanent Rose and Cadmium Yellow pale. Then I added Yellow Ochre. I’m still playing around with how much of each. And I’m still struggling with what color to mix for the shadows on her face. Add payne’s grey? or the compliment?
mix2mix

I painted the shape of her head in the skin tone. Then I experimented with adding the detail – the hard part! I hated all of them. But, I learned from them – the pencil is too sharp and fine, too much detail in this one, etc.
skintone

Today, I decided to try again. Before I started I looked at sample watercolor illustrations. Then, I tried again. I haven’t gotten there yet, but I am further along then last week!

Beach girl – drawing her face 100x

bgface2b

I decided to draw 100 faces, to find the right face for my beach girl character. I couldn’t believe how quickly I fell in love with a face! It was the 9th one I drew. I did a few more after that, but I think she is the one!

bgface3

I started out with 24 circles on the page – assuming I do several pages to reach 100. I only made it to 17!

bgface1

I tried her face from different angles, using what I learned from Shoo Rayner – Drawing School (video “Draw characters from different angles“). I need to work on the different angles more.

angles2

I also put her face on her body. I’m excited. I feel like I’m getting somewhere.

bgbody

11 Art Supplies I can't paint without 6 Tips on Developing your own Illustration Style


Beach girl – working on an illustration style


girl at the beach

A couple of years I go I did this sketch of a girl (my daughter) at the beach. I love how loose it is. I love the movement. I aspire to be a children’s book illustrator, or at least develop a children’s book style, and I think this sketch is a step towards my style. I want to fully develop this beach girl character.

Here are sketches of my sons (also from a couple of years ago).

boybeach littleboybeach

A year or so prior to this, I worked on developing an illustration style for I book I had written, “The Claddagh Fairy.” Although it was a great exercise and experience, I don’t think the illustration style is fully “me.” It isn’t loose enough, too much computer. But maybe it was me at the time, just not now.

I did this sketch this week. Definitely needs work, but I’m excited to play and work on developing my characters. I’ve watched some great videos and now have concrete ways to go about it.

beach kids

Links:
Lynne Chapman (How to draw a child’s face)
Shoo Rayner – Drawing School (How to design Children’s Book Characters)

Developing a Children’s Book Illustration Style (Part I)

A few years ago I wrote a children’s book and wanted to illustrate it. I was pretty good at drawing things realistically. But how do you draw in a children’s book style? How do you develop your own style? I searched for books on the topic and found “Illustrating Children’s Books: Creating Pictures for Publication” by Martin Salisbury. This book gives a great overview of all aspects of children’s book design, including: a brief history, different media and techniques, character development, design and typography, and getting published, as well as several case studies. I enjoyed this book. It examines all the techniques needed to illustrate for children, but in the words of Salisbury it is not a “how to” book and doesn’t contain “easy steps to stylistic tricks or wizardry.” I now had a greater understanding of the field of children’s book illustration, but still felt lost as to where to start illustrating my own book. The only instructional books I found on drawing in a style were specific to Manga and comics. It seemed I would have to figure this out on my own.

11 Art Supplies I can't paint without

I spent time reading about other illustrators’ processes and looked through tons of children’s books to see what I liked, what the illustrations had in common and what might be “in line” with my current drawing style. I even emailed a few illustrators, and Illustrator Scott Magoon offered this advice,

“Thanks very much for your kind works about my illustrations in Mostly Monsterly. I’m flattered that you’re using it as a sample animation style! As for how I developed it, well, I’ve been drawing for many years and I guess it’s sort of just grown out of lots and lots and lots of drawings – and borrowing elements from illustrators I admire.

If you find that your drawings are too realistic for children’s books, it sounds like you may need to try to abstract your drawings more. Perhaps trying to keep your drawings very loose may help – don’t close all of your circles for instance – perhaps the perspective could be slightly skewed – or, if you use color, color outside the lines so to speak. Look at some books on cartooning or at cartoonists you admire and see how they simplify gestures, movement, facial expressions to very, very simple shapes, lines and compositions.”

I realized there was no quick answer. Developing a style was going to be a process. I needed to get to work. I picked a few children’s book illustrations that I loved and drew them. (These included Joe Berger, the illustrator of “Hattie the Bad” and Vicky A. Fieldhouse.) I thought of it as a way to study each illustrator’s technique and as a way to determine the common elements in children’s book illustration.

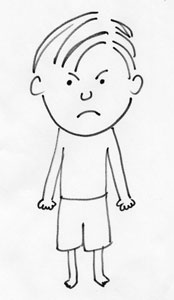
  • Exaggerate features – like big eyes or wacky teeth
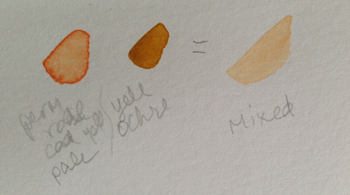
  • Color palette – stick to 3 colors
  • Kids – small bodies, big heads
  • Use marker
  • Outline

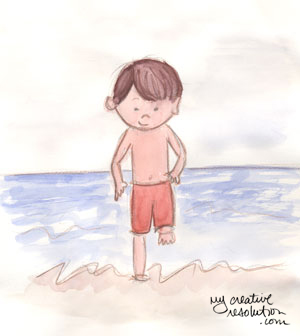
I took a photo of my son and tried to draw it as a children’s book illustration. It still wasn’t cute enough. Then I tried to draw it again using the first drawing as reference, NOT the photo. Each time I drew it, it got more watered down, more loose and less realistic. It was a great exercise.

childrens1childrens2childrens3

I’m happy to be on the path to developing my children’s book style. The steps I recommend to anyone else wanting to start are:

  1. Research. Get a synopsis of the industry in “Illustrating Children’s Books: Creating Pictures for Publication.” Then look for children’s book illustrations that you like. Search online for information about the illustrator’s process.
  2. Practice. Start drawing! Draw multiple versions. Each time try it a slightly different way. When you’ve filled the page – see which ones you like and ask yourself why.


Related Posts you may enjoy reading: