Easy Acrylic Beach Painting

beachaerial
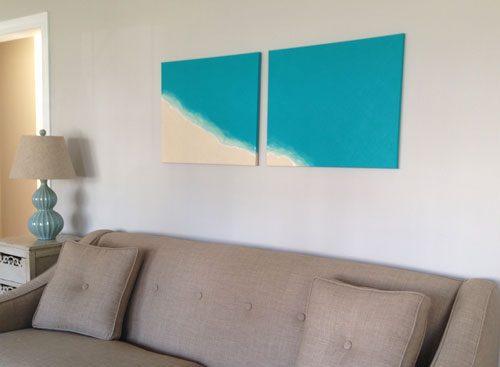
I needed something to hang on the bare wall over the couch. I had the idea to create an aerial view of the beach on two canvases. I wanted it to be very simple – 2 areas of solid color. The area where they meet would have a little more detail to hint that it is a beach shot from above.

Here’s my sketch and the acrylic paint colors I selected – Buff White and Cobalt Teal. Similar paints Windsor & Newton Buff Titanium and Liquitex Cobalt TealYou’ll also need a small amount of white.
beachacrylicaa
I put two 20 x 24″ canvases together to sketch where the shoreline would be and to ensure the canvases line up.
beachacrylic1
I painted each of the solid areas. 
beachacrylic2

Then, I added a thin layer of the blue over about 2″ of the sand nearest the shoreline. This is the shallow area of the ocean. At the edge of this area (and the sand) I added a thin uneven line of white for the ocean’s foam.

I was really happy with the results! Let me know if you give it a try.
overcouch

This contains affiliate links to products/brands I use and recommend. I earn a small commission whenever you buy using these links, at no additional cost to you. Thank you for supporting my blog!

Have you read:
Six Ways to bring the Beach into your Home https://mycreativeresolution.com/2017/05/19/six-ways-to-brin…h-into-your-home/ Process for Painting the Beach in Watercolor 14 tips on painting waves in watercolor
Easy steps to paint a sunset sky and a tree in acrylic paints

Easy Acrylic Beach Painting anyone can make!

April = Art Supply Shopping

aprilshowers orangeflowers
Wow, April is flying by! The first couple of days I spent preparing to host Easter. The following day we took the kids to Washington, D.C. The last couple of days I’ve been busy celebrating my birthday! Okay I don’t love that I’m 45, but I love my Birthday! Yesterday I took my Birthday money (I sound like I’m twelve) and went to Blick.

I usually try to restrain myself at Blick. I know you can easily go overboard with art supplies and buy everything. And end up not using it for months, if ever! I usually try to buy only things I have an immediate need for. But with my Birthday money burning a hole in my pocket I bought almost everything on my list:

  • More Tombows for hand lettering. I love the one I bought previously, but it’s getting frayed.
  • 2 square pads of watercolor paper. I love square and they didn’t have any last time
  • 1 large pad of watercolor paper. I used up the last one.
  • Canvases! I want to paint in acrylic paint again.
  • Acrylic paint in a beautiful aqua and a sand color. I have a vision for a 2 canvas painting!
  • Gouache! It’s on my 2015 list of things to try. So I finally splurged on a beginner mixing set.

I didn’t buy a set of watercolors. My last set is a mess, but I’m still working off what I squeezed into my palette, so I really don’t need a new set. Also, I think I should just replace colors as I need them and not buy a set. There was a limit to the Birthday money!

All this new stuff is definitely helping to motivate me. My trip interrupted my streak of painting everyday, so I’m trying to get back into it.
Happy Spring! 🙂


Love this Sketchbook!

sketchbooknew
Since I bought this sketchbook I’ve been busy filling it! I love the heavy paper. It works so well with watercolor. If you follow me on Instagram (@mycreativeresolution), you’ve probably seen some of these illustrations. Lately I’ve been posting everyday which helps keep me motivated. I setup my sketchbook and paints in the morning. Throughout the day I sit down to tweak or add to my painting. I’m going to need a new book soon!

“Valentine’s Day Love” Pattern

valentine'sdaypattern
I’m in the heart/love frame of mind this week, as I am posting a new Valentine’s Day inspired photo to Instagram, every day from February 1st – the 14th! (@mycreativeresolution) So, it’s no surprise that my digital pattern of the month is also Valentine’s Day inspired.

I’m getting into creating art in Photoshop, especially with doodles that originate in my sketchbook. The process is a lot quicker than I thought it would be. And the amount of different textured brushes is awesome. Where have I been?!

I’m excited to continue trying new brushes – last month I used a watercolor brush for my January pattern. This month I used the Soft Oil Pastel brush. I wanted the background to have texture – but that can be an issue when you repeat the pattern because irregularities won’t line up. I used a fade so that it wouldn’t be an issue, but I’d like to learn more about the technicalities of creating repeating patterns.

It’s ironic that two of the things I’ve been working on so far this year, are so different! Linocut seems like an old craft, and digital illustration is on the other end of the spectrum! Time will tell how things shake out and in what form I continue to work.

It’s been so fun, I may have to do another pattern before February is over!

Here is the pattern without the repeat:
valpatternnorepeat

Giving my artwork as a gift.

housesdoors
I’ve been playing around with the idea of giving whimsical house (or door) paintings as hostess gifts (either framed or made into ornaments). I’ve come a long way this year, in terms of my confidence as an artist, but there is something scary about giving my artwork as a gift! Regardless of whether or not I’ll get up the nerve – I’ve started painting. The house is my brother and sister-in-law’s. I definitely want to try another version!

Here are my steps:
brothers1brothers2
brothers3brothers4


A Crisp Fall Day!

fallleavesfinal
Fall is one of my favorite times of year. I love those sunny, crisp, blue sky days. Unfortunately they lead to damp, grey, cold days! Today is the perfect Fall day. I’m going to enjoy it while it lasts! 🙂

This painting was part of my painting party. I worked very wet, letting the colors bleed together, only hinting at each leaf. I added several layers of paint. After I was done, I added some details with ink.

leaves1leaves2

Table full of projects

table2
Today I set up the table like I was having a painting party – although it was all for me! I set up 4 different seats. I grabbed a couple of different leaves from the yard and some apples. I sat at 3 of the seats, working from a different subject each time. I went back and added paint to the fall leaves painting (left) and the red leaf painting (middle). I’m excited to add ink to the fall leaves painting!

I decided to work this way because:

  • I didn’t have a set subject I wanted to work on.
  • Since you need to let the paint dry before you can add more color and detail, it’s the perfect time to switch seats and projects!
  • I wanted to end up with several watercolors that I could continue to paint or add ink to.

Last week I had a lot of success with my sunflower project, where I started the painting several times. Ironically, I thought the success was what I turned the outtakes into. Not the final sunflower painting! So, I wanted to start a couple of projects and see what I could do with them.

My personal painting party:
table


Working with outtakes

sunflowerouttakes
The other day, when I was painting sunflowers, I started several versions before selecting one to work on in more detail. Today I decided to see what I could do with two of these “outtakes.” I used an ink pen and started scribbling away.

The first outtake immediately reminded me of a feather (when the sunflower’s center flowed all over the paper). So I added ink and made it a feather.

Outtake #1:
feather1

The second outtake, looked like a bunch of sunflowers, so I added ink to make it look more finished. Lately I’ve been having fun playing with ink. In the past I shied away – thinking the outline had to be precise and perfect. Now I’m just scratching away, the way I would with a pencil. Is my style coming out?!

Outtake #2:
sunflowers2